Sunday, May 30, 2010

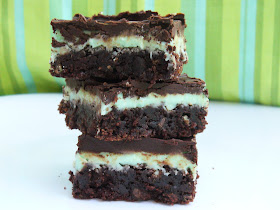
Creme De Menthe Brownies


My sister Diana was coming into town and she requested that I make brownies with a mint frosting and a hard chocolate topping. These turned out really good and she really enjoyed them as well as the rest of my family, myself, and a some neighbors. They were fudgey, chocolately, minty, and really yummy!

For the Brownies:

-1 box of your favorite brownie mix  for a 13x9 pan
-eggs, oil, and water called for on the box
-1 cup of andes mint pieces

Directions:
Make brownies according to package directions and mix in the andes mints.

For the frosting:
-3 cups powdered sugar
-1/3 cup margarine or butter, softened
-3/4 tsp. mint extract
-1/4 cup milk

Directions:
Beat the powdered sugar and margarine together. Add in the milk and mint extract and beat until it is the consistency you like. Spread frosting on cooled brownies.

For the chocolate topping:
-2 cups chocolate ( I used chopped dove dark chocolate)
-6 tablespoons butter

Directions:
In the top of a double boiler, melt chocolate and butter until smooth. Spread on top of the frosted brownies. Let chocolate harden and then serve. (I think these brownies taste best cold and just out of the refrigerator!)


Friday, May 28, 2010

Pretty in Pink Lemonade Cupcakes


The weather has been absolutely beautiful for the past week and a half, sunny and warm; I have been waiting for this weather all winter long! Summertime is the perfect season for lemonade and while I was shopping I found cute sour gummies that inspired me to make these adorable pink lemonade cupcakes!


My little cousin Lily was over and she loves to get in the kitchen and bake with me and we had a great time and she really loved the cupcakes! Everyone that tried these really, really enjoyed them. I sent some to work with my dad, and sent some to my boyfriend's house, and had some for my family. These didn't have a huge lemonade flavor, but you could definitely taste the tang at the end. I love the pink color of the cupcake and the cute straw and sour gummy on top!


For the Cupcakes:
-1 box (18.25 oz.) Betty Crocker white cake mix
-3 large eggs
-1 1/4 cups pink lemonade
-1/3 cup vegetable oil
-3 squirts of lemon juice
-pink or red food coloring

Directions:
Preheat oven to 350 degrees F. Line cupcake tins with paper liners or spray with cooking spray. With an electric mixer, beat the cake mix, eggs, pink lemonade, oil, and lemon juice, at low speed for 30 seconds and then at medium speed for 2 minutes. Mix in food coloring to desired liking. Pour evenly into prepared cupcake tins. Bake for 18-22 minutes. Let cool in pans for 10 minutes and then remove from pans and cool completely.

For the Frosting:
-1/2 cup margarine
-1/2 cup shortening
-1/8 tsp. salt
-1 1/2 tsp. vanilla
-5 cups powdered sugar
-1/4 cup pink lemonade

Directions:
In a large bowl, cream margarine and shortening until light and fluffy. Add salt, vanilla, powdered sugar, and pink lemonade. Beat well.

Frost the cupcakes and decorate with colored sprinkles, sour gummies, and straws if desired.


Sunday, May 23, 2010

SMS: Butterscotch Pralines


This is my first Sunday baking with Sweet Melissa Sundays, which is where a group of food bloggers bake our way through The Sweet Melissa Baking Book by Melissa Murphy. Each week a different member chooses a recipe to bake from Melissa's baking book. I am very excited about doing this and can't wait to see how all of Melissa's yummy recipes turn out. Her baking book has tons of great recipes in it! This week, Tessa, from The Cookin' Chemist, chose to make butterscotch pralines, so make sure to check her blog out for the recipe and see how hers turned out. 


Overall, these turned out really, really good and my whole family really enjoyed them. They had a great butterscotch flavor which I love and were really quick to make.  But, I think I should have cooked the sugar a little bit longer because the mixture was a bit thin, and some of my butterscotch pralines were pretty thin, but, they still hardened and tasted great! I will make sure to give these another try sometime and cook the sugar a bit longer!


Friday, May 21, 2010

Nutella Pound Cake or.....Nutella Pound Cake Trifle?


My mom asked if I would make her a dessert to take over to my Aunt's for dinner tonight and I of course said yes! I love any reason to get into the kitchen and bake up something sweet and delicious and try out some of the many recipes that I have bookmarked to try! And oh boy did I have just the perfect recipe to try out.....nutella pound cake which I found from Debbie from mocha me blog. She raved about this recipe and I love nutella, so I knew that I had to try it out! 

So, I bet you are wondering why my nutella pound cake turned into a trifle! Well, here we go, I preheated my oven to 325 degrees F., I greased and floured my loaf pan, and I made the pound cake batter, which turned out wonderfully, I baked it for 1 hour and 15 minutes (and let me tell you that the smell of the pound cake baking was absolutely heavenly), I let it cool in the pan for 15 minutes and thats when the disaster struck.....only a little more than half of my pound cake came out of the pan and the top was a tiny bit sunken in the middle (I guess I didn't do a very good job at greasing and flouring the pan and I probably should have let it cook a few minutes longer). I immediately got a little bit frustrated (I completely hate it when my baked goods don't turn out) and told my mom what happened....she didn't really know how to help except say that it is okay and that was going to take it anyways. But, I didn't want her to take a broken and sunken looking pound cake for everyone to eat. (Sorry, I should have taken a picture of my broken cake, but, I was in too much of a rush!) 

So, I went back downstairs a little upset and then the idea came to me to make a Nutella Pound Cake Trifle! We had strawberries in the fridge that my mom was going to serve with the cake and my wonderful dad made a quick stop down the street to get some cool whip (although he didn't get enough...so I had to make due with what he got). I thought a trifle would be a great idea and no one would have to know about my little baking disaster and they could still enjoy a yummy dessert because after all.....isn't dessert the best part of a dinner party?!

My mom told me that everyone really, really loved the dessert and my Aunt said it was delicious!

I tried a few pieces of the pound cake before I put together the trifle and it was really, really delicious! So make sure and give this recipe a try...either in cake form or in trifle form....they both tasted wonderful! 


For the Nutella Pound Cake:

Ingredients:
-1 1/2 cups flour
- 4 large eggs, at room temperature
-2 teaspoons pure vanilla extract
-3/4 teaspoon baking powder
-1/4 teaspoon salt
-2 sticks unsalted butter, softened
-1 1/4 cups sugar
-1 jar (13 oz.) Nutella

Directions:

1. Preheat oven to 325 degrees F. Lightly grease and flour a 9x5 loaf pan. In a small bowl, lightly beat the eggs with vanilla, set aside. In a medium bowl, whisk the flour, baking powder, and salt together, set aside.

2. In a large bowl, using a handheld mixer, beat the butter with the sugar at medium high speed until fluffy, about 3 minutes. With the mixer at medium low speed, gradually beat in the egg mixture until fully incorporated. Add the flour mixture in 3 batches, beating at low speed between additions until just incorporated. Continue to beat for 30 seconds longer.

3. Spread 1/3 of the batter in the prepared pan, then spread half of the nutella on top. Repeat with another 1/3 of the batter and the remaining nutella. Top with the remaining batter. Lightly swirl the nutella into the batter with a butter knife.

4. Bake for 1 hour and 15 minutes, until a toothpick inserted in the center comes out clean. Let the cake cook in the pan for 15 minutes. Invert the cake onto a wire rack, turn it right side up, and let cool completely, about 2 hours. Cut cake into slices and serve or make my Nutella Pound Cake Trifle.

For the trifle:
-1 loaf of Nutella Pound Cake, cut into 1 inch cubes
-16 ounces cool whip
-4 cups of strawberries, sliced (I sliced the strawberries and sprinkled the with sugar and let them soak in the refrigerator for a couple of hours, but plain ones would work just as well)

Directions:

In the bottime of a trifle bowl, place half of the pound cake cubes, then top with half of the cool whip, and then top with half of the strawberries. Repeat layers once more.


Tuesday, May 18, 2010

Pecan Pie Bars


I made these yummy and nutty pecan pie bars to take over to my boyfriend's mom because she doesn't like chocolate or any desserts that are too sweet. Usually, I bake sweets that have chocolate in them because I absolutely love chocolate and when I take them over his mom always says I never make anything for her! So, she told me one of her favorites is pecan pie and I decided to make these really simple and really, really good (as his dad told me) pecan pie bars. They had a soft, yet, firm crust with a filling that was  both smooth and crunchy; the filling had a smooth, buttery, and caramelly filling and a crunch from the nutty and buttery pecans! These little bars were enjoyed by his family and are delicious served by themselves or served with some ice cream!

Ingredients:

For the crust:
-3/4 cup flour
-1/4 cup butter (1/2 stick), softened
-2 tablespoons brown sugar, tightly packed

For the filling:
-2 eggs
-1/4 cup plus 2 tablespoons light corn syrup
-1/4 cup plus 2 tablespoons granulated sugar
-1 tablespoon butter, melted
-1/2 teaspoon vanilla
-2 cups chopped pecans

Directions:

1. Preheat oven to 350 degrees F. Grease the bottom and sides of a 8x8 inch baking pan.


2. For the crust, mix together the flour, butter, and brown sugar until crumbly. Press mixture into the prepared baking pan and bake 10-12 minutes, until lightly browned.


3. For the filling, beat eggs, corn syrup, sugar, butter, and vanilla with a whisk. Stir in the pecans and pour over baked crust, evenly. Bake for 20-25 minutes or until the filling is set (start checking at about 15 minutes and if the edges are browning too much, cover with foil).

4. Cool completely on wire rack and cut into bars and serve.


Friday, May 14, 2010

Chocolate Banana Muffins with Peanut Butter Chips


Bananas, bananas, bananas.....I love bananas and the weird thing about that is that just a couple years ago I did not like them at all!...there was something about the texture that I didn't like, but now I eat one basically everyday....weird huh?! But anyways, I had some ripe bananas to use up and I found a recipe for double chocolate banana bread on The Sisters Cafe blog (you should check their blog out they have a lot of yummy recipes) for double chocolate banana bread that looked really yummy and I wanted to make something different then just regular banana bread. Instead of making bread I decided to make mine into muffins and instead of chocolate chips, I used peanut butter chips because I love the combination of chocolate, peanut butter, and bananas.


These muffins turned out good and were moist and very chocolately! My brother especially really, really enjoyed them a lot, in fact, I think he ate most of them by himself! I asked him what he liked about them and he said that he loved the chocolate and peanut butter combination with the hint of the banana flavor in the background.


Chocolate Banana Muffins with Peanut Butter Chips (recipe from The Sisters Cafe, adapted by me)

Ingredients:

-1 cup sugar
-1/3 cup vegetable oil
-1 1/4 cups mashed bananas (about 3)
-1 tsp. vanilla extract
-1 1/2 cups flour
-1/2 cup cocoa
-1 tsp. baking soda
-1/2 tsp. salt
-1 cup peanut butter chips

Directions:

1. Heat oven to 350 degrees F. Spray a 12 cup muffin pan well with cooking spray, including the top of the pan, or line with paper liners.
2. Beat sugar, eggs, and oil in a large bowl at medium speed until combined. Beat in bananas and vanilla at low speed. Combine flour, cocoa, baking soda, and salt in a medium bowl; beat into banana mixture at low speed just until combined. Stir in 3/4 cup of peanut butter chips into batter.
3. Spoon batter evenly into prepared muffin pann (I use my ice cream scoop) and sprinkle the remaining peanut butter chips on tops of the muffins. Bake about 15-20 minutes or until toothpick inserted in the center comes out clean. Cool about 10-15 minutes. Remove from pan, cool completely on wire rack.


Wednesday, May 12, 2010

Peanut Butter & Chocolate Buckeye Bars


I really wanted to bake something yesterday but I just couldn't decide on what sounded good or what I wanted to make. I saw that we had a package of Betty Crocker Chocolate Peanut Butter Chip cookie mix sitting in the cupboard and so it came to me to make some kind of peanut butter and chocolate bar. I decided to do a take on one of my boyfriend's favorite Christmas treats, buckeye's or peanut butter balls, which he usually only gets at Christmas time. These little bars were way easy to make and much less time consuming then buckeyes.....they were smooth and creamy and peanut buttery and chocolately and they had the added bonus of the cookie base. Let's just say my boyfriend really, really enjoyed them...you should have seen his face when he took his first bite! It always puts a smile on my face when others enjoy the things I make. If you love chocolate and peanut butter, you will enjoy these bars and they go a long way because they are very sweet and rich!


Ingredients:

For the Crust:
-1 (17.5 oz.) package Betty Crocker Chocolate Peanut Butter Chip cookie mix
-1/3 cup vegetable oil
-2 tablespoons water
-1 large egg

For the Filling:
-1 1/2 cups peanut butter
-1/2 cup (1 stick) butter or margarine
-1 teaspoon vanilla extract
-1 1/2 cups powdered sugar

For the Topping:
-2 cups milk chocolate chips
-2 tablespoons shortening or butter

Directions:

1) Preheat oven to 350 degrees F. Line a 13x9 inch baking pan with foil extending over the edges and spray with non-stick cooking spray.
2) For the crust: Mix cookie mix, oil, water, and egg together until blended. Press into the bottom of the prepared pan. Bake 10-12 minutes and cool completely.
3) For the filling: Mix peanut butter, butter, and vanilla with an electric mixer until well blended. Add the powdered sugar, a little at a time with mixer until well blended. Spread evenly onto cooled cookie crust.
4) For the topping: Melt 2 cups chocolate chips and shortening in a double boiler until completely melted and smooth. Pour over peanut butter filling and spread evenly.


Monday, May 10, 2010

Sugar Cookies and Cake Balls

Happy Mother's Day to all of you wonderful Mommy's! For my family, we celebrated with a family party, my grandparents came into town and all of my Aunt's and Uncle's and cousin's came over. We had a cookout with lot's of yummy food. I chose to make these cute little sugar cookie and cake ball flower bouquets. I found the cake ball recipe from Bakerella's blog. These little balls of deliciousness are very, very popular all over the internet and on blogs. They were a bit time consuming, but all of my cousin's enjoyed them and I thought they turned out so cute and they are very versatile...you can use any kind of cake mix and frosting you want! I got the sugar cookie recipe from Kim at Lovin' from the Oven and it was called a no fail sugar cookie recipe and they turned out really great and had a very great taste. I made mine pretty thick, so they were nice and chewy on the inside with crisp edges. I used a royal icing for the cookies and I didn't like it very much, so, next time I will stick to a vanilla buttercream that we usually use.I have been having trouble with the sugar cookie recipe that my family always uses, so I wanted to test out a new one and these were wonderful. I will definetly keep on making these ones!

Cake Balls: (Bakerella)

-1 box any flavor cake mix, cook as directed on the box for a 13x9 pan (I used funfetti cake mix)
-1 (16 oz.) can frosting (I used funfetti frosting)
-1 package chocolate bark (regular or white, I used white chocolate chips and added about a tablespoon of shortening)
-sprinkles (optional)

Directions:

1. Make cake according to package directions and cool completely. After cake has cooled, crumble the cake into a large bowl.

2. Mix thoroughly with 1 can of frosting.
3. Roll mixture into quarter size balls and lay on a cookie sheet.

4. Chill for several hours. (You can speed this up by putting them in the freezer.)
5. Melt chocolate in microwave per directions on package. (Since I used chocolate chips, I melted them over a double boiler with about a tablepoons of shortening.)
6. Roll balls in chocolate and sprinke with sprinkles if desired and lay on wax paper until firm.


No Fail Sugar Cookies (Lovin' From the Oven):

Ingredients:

-6 cups flour
-3 tsp. baking powder
-2 cups butter, softened
-2 cups sugar
-2 eggs
-2 tsp. vanilla extract or desired flavoring
-1 tsp. salt

Directions:
Cream butter and sugar until light and fluffy. Add eggs and vanilla. Mix well. Mix dry ingredients and add a little at a time to butter mixture. Mix until flour is completely incorporated and the dough comes together.

Chill for at least 1 to 2 hours.

Roll to desired thickness and cut into desired shapes. Bake on ungreased baking sheets at 350 degrees F for 8 to 10 minutes or until just beginning to turn brown around the edges. This recipe can make up to 5-dozen 3" cookies. (I halved the recipe and made mine pretty thick, so, I got about 16 big sugar cookies.)


Wednesday, May 5, 2010

Baja Style Fish Tacos

Tonight for dinner I decided to make fish tacos for Cinco de Mayo.....in order to make them that meant that I had to overcome my fear of deep frying : (. For some reason, the thought of frying food has always freaked me out.....it might be the thought of the really hot oil splattering everywhere and splattering on me and burnig me, or burning the food, or not cooking it enough and having raw, soggy food, or the fear that the oil will just start on fire. But, tonight none of those awful things happened to me and the fish tacos were fabulous. My family and I really, really enjoyed them. While we were eating, I aksed everyone if they liked them and no one really said anything and finally my mom chimed in and said I think everyone is so quiet because these tacos are sooo good and everyone agreed! The fish was light, flaky, and moist on the inside and the batter on the outside was nice and crispy, the cream sauce was really good and so easy to put together, it had a nice lemony tang and freshness and was very creamy which went along great with the spicy jalapenos and salsa. This recipe is from Marcela Valladolid from the Food Network channel and everyone who rated this recipe gave it awesome reviews and it definitely did not disappoint. Happy Cinco de Mayo everyone!
Baja Style Fish Tacos (recipe courtesy Marcela Valladolid, Food Network)

Ingredients:

Beer Batter:
-1 cup all-purpose flour
-1 teaspoon salt
-1/2 teaspoon ground black pepper
-1 cup dark Mexican beer (but any beer would work)

Cream Sauce:
-1/3 cup mayonnaise
-2/3 cup Mexican crema or sour cream (I used sour cream)
-1 teaspoon grated lemon zest
-2 tablespoons fresh lemon juice
-2 tablespoons water
-salt and pepper, to taste

Fish Tacos:
-oil, for frying
-1 cup all-purpose flour
-1 teaspoon salt, plus more for seasoning
-2 pounds skinned halibut cut into 5 by 1/2-inch strips (I used cod because I couldn't find halibut)
-freshly ground black pepper
-corn tortillas (I toasted them on a pan on the stove so that they were pliable and wouldn't break)
-2 cups shredded cabbage
-2 cups tomatillo salsa (store bought or homemade) for garnish, optional (I used a red taco sauce)
-pickled jalapenos, for garnish, optional

Directions:

For the Beer Batter:
Mix the flour, salt, and pepper in a medium bowl. Gradually add in the beer while whisking. Set aside and let the batter rest for 15 minutes before using.

For Cream Sauce:
Add the mayonnaise and crema or sour cream to a medium bowl. Whisk in the lemon zest, lemon juice, amd water. Season, to taste, with salt and pepper. (THis can be made 3 days ahead, covered and refrigerated).

For the Fish: 
In a large skillet, over medium heat, add enough oil to reach a depth of 1-inch. Heat the oil until a deep-fry thermometer registers 350 degrees F.

On a large plate, combine flour and salt. Season the fish pieces all over with salt and pepper and coat with the flour. Working in batches, dip the fillets in the beer batter and coat on both sides. Fry in the hot oil until golden brown and cooked through, about 5 minutes. Transfer to paper towels to drain. (I also heated my oven to 250 degrees F and kept the fried fish warm while I was making the other batches of fish.)


Here is the fish dredged in flour.

Mmmm....crispy and golden brown yummy little fried delights!

To make the tacos:
Top warmed tortillas with fish and top each with cream, shredded cabbage, salsa, and pickled jalapenos, if desired.

Dulce de Leche Brownies


Happy Cinco De Mayo everyone! Today I am celebrating with these really yummy and scrumptious, moist, chocolately, caramely, and oh so ooey and gooey Dulce de Leche brownies and fish tacos for dinner (I will post that later)! Dulce de Leche is a Mexican caramel and it is very delicious! I got the idea to make these brownies from Dave Lebovitz, although I used my favorite brownie  recipe (The Baked brownie and I halved it) and I didn't make my own Dulce de Leche....but next time I will use Dave's brownie recipe and attempt to make my own Dulce de Leche and I will definetly post how they turn out! I will post both brownie recipes for you because they both have gotten really great reviews. I definetly reccomend giving these a try, they are absoultely yummy!

Here is the Baked Brownie recipe that I used (halved):

Ingredients:

-1/2 cup plus 2 tablespoons all-purpose flour
-1/2 teaspoon salt
-1 tablespoon dark unsweetened cocoa powder
-5 1/2 ounces dark chocolate (60-72% cacao), coarsely chopped (I used ghiradelli chocolate chips)
-1/2 cup (1 stick) unsalted butter, cut into 1-inch pieces
-1/2 tespoon instant espresso powder (I omitted this for this recipe)
-3/4 cup granulated sugar
-1/4 cup firmly packed light brown sugar
-2 eggs plus 2 tablespoons egg (I beat 1 egg slightly and measured out 2 tablespoons because 1 egg is equal to 1/4 cup, so you really will need 3 eggs)
-1 teaspoon pure vanilla extract
-13.4 ounce can of Dulce de Leche

Directions:

Preheat oven to 350 degrees F. Butter the sides and bottom of a 9x9 inch baking pan.

In a medium bowl, whisk flour, salt, and cocoa powder together.

Put the chocolate, butter, and instant espresso (if using) in a large bowl and set it over a saucepan of simmering water, stirring occasionally, until the chocolate and butter are completely melted and smooth. Turn off heat, but keep the bowl over the water and add the sugars. Whisk until completely combined, then remove the bowl from the pan. The mixture should be room temperature.

Add 2 eggs to the chocolate mixture and whisk until combined. Add the remaing 2 tablespoons of the beaten egg and whisk until combined. Add the vanilla and stir until combined (do not overbeat.)

Sprinkle the flour mixture over the chocolate mixture. Using a spatula, fold the flour mixture into the chocolate until just a bit of the flour mixture is visible.

Pour half of the brownie batter into the prepared pan and drop one-third of the Dulce de Leche, evenly spaced, over the brownie batter, then drag a knife through to swirl it slightly.


Spread the remaining brownie batter over, then drop spoonfuls of the remaining Dulce de Leche in dollops over the top of the brownie batter. Use a knife to swirl the Dulce de Leche slightly.

Bake for about 25-30 minutes (start checking their doneness after about 20 minutes), rotating the pan halfway through the baking time, until a toothpick inserted into the center of the brownies come out with a few moist crumbs sticking to it. Let the brownies cool completely (if you can wait that long...I couldn't!) and then enjoy!


You can find Dave Lebovitz's Dulce de Leche Brownie recipe here at  http://www.davidlebovitz.com/archives/2006/06/dulce_de_leche.html