Monday, February 28, 2011

Tropical Island Fruit Pizza


Oh, how I wish that I was vacationing on a tropical island.....
basking in the bright sun with my toes in the sand, a pina colada in hand, listening to the waves crash onto the beach, with a beautiful view of the ocean and palm trees. Oh, how I wish....wouldn't that be wonderful?

Unfortunately, a tropical island get away is not possible for me, so, instead I made this tasty fruit pizza that tastes like a tropical island! Well, okay I don't know what a tropical island tastes like! But if I did, the flavors in this fruit pizza would be it! Give this a try if you are in need of a vacation!
You can imagine that you are somewhere warm and sunny with every bite of this pizza!
Tropical Island Fruit Pizza:

For the pizza dough:
-1 roll (16.5 oz.) refrigerated sugar cookie dough
For the toppings:
-1 package (8 oz.) cream cheese, softened
-1/2 cup powdered sugar
-1 teaspoon coconut extract
-2 kiwis, sliced
-1/2 cup strawberries, sliced
-1/2 cup pineapple, sliced
-1/2 cup toasted coconut

Directions:
1. Preheat oven to 350 degrees F. Line a 13x9-inch baking pan with aluminum foil and spray with non-stick cooking spray. Press cookie dough evenly into the bottom of the prepared baking dish. Bake for 11-15 minutes, or until lightly golden brown and firm to touch. Cool completely.

2. In a medium bowl, blend together the cream cheese, powdered sugar, and coconut extract. Spread the cream cheese mixture evenly onto the baked cookie. Decorate with sliced fruit and sprinkle with toasted coconut. Slice and serve immediately or refrigerate until ready to serve.

*To toast coconut- preheat oven to 350 degrees F. Layer desired amount of coconut evenly onto a baking sheet. Bake for 10-15 minutes, stirring once. Be sure to watch carefully!*

Thursday, February 24, 2011

S'mores Pie


This pie had  me dreaming of and longing for my family summer vacations in the U.P. that we go on every year. I have fond memories of staying out late by the campfire, sitting under what seemed to be billions and billions of bright, shiny, twinkling stars, hoping to see a shooting star fly by, all the while eating delicious and classic s'mores! S'mores are one of my favorite parts of summer! Roasty, toasty, and oh so gooey golden brown marshmallows and creamy Hershey's milk chocolate bars that get all nice and melty are sandwiched between sweet and crunchy graham crackers! Sticky and messy  but so finger-licking yummy!

Oh, how I wish it was summer, do you? But, since its not summer, I suggest making this pie! It will remind you of summer. With it's sweet graham cracker crust, smooth milk chocolate filling, and perfectly toasted marshmallows on top, you will feel all happy and warm inside, even if it is just for a few minutes. Enjoy!

S'mores Pie: (adapted from How Sweet It Is & from here)

Ingredients:
-1 1/2 cups graham cracker crumbs
-8 tablespoons butter, melted
-7 ounces milk chocolate, broken into chunks
-1 cup heavy cream
-1 egg
-1 teaspoon vanilla extract
-pinch of salt
-3 1/2 cups mini marshmallows

Directions:
1. Make the crust: In a small bowl, combine the graham cracker crumbs and melted butter until the butter is fully incorporated and crumbs are moistened. Spray a 9-inch pie pan with non-stick cooking spray  and firmly press the graham cracker crumbs up the sides and on the bottom of the pie pan (I used the bottom of a measuring cup). Chill in the freezer for 10 minutes.

2. While the crust chills, preheat the oven to 350 degrees F and prepare the filling. Put the chocolate in a large mixing bowl. Heat the cream until scalded-do not boil. Pour the cream over the chocolate and allow to stand for 1 minute. Whisk the cream and chocolate together until glossy and smooth. Add the vanilla, pinch of salt, and egg into the chocolate mixture and whisk to fully incorporate. Pour into chilled crust and bake for 25 minutes, or until the filling is set but still slightly wobbly in the center. Remove from the oven and top with mini marshmallows. Turn your broiler to low and put pie back in the oven to toast the marshmallows for about 2-3 minutes (watch very closely so the marshmallows don't burn)! Remove and cool completely before serving.

*To make slicing easier, spray a knife with non-stick cooking spray so the marshmallows don't stick!*

Thursday, February 17, 2011

Giant M&M Cookies


These M&M studded sugar cookies are quintessential to those giant cookies found in the mall at a Mrs. Fields that every kid loves! These sweet cookies are slightly crispy on the edges, yet so soft and chewy on the inside, and sprinkled evenly with colorful chocolate M&M's. What's not to love?

 I meant to put these up on Valentine's Day but didn't get the chance too! The good thing about these is that they are perfect for any occasion using holiday M&M's or regular M&M's!

Giant M&M Cookies: (source, What's Gaby Cooking)

Ingredients:
-1 cup butter, softened
-1/2 cup brown sugar
-1 1/2 cups white sugar
-2 eggs
-2 1/2 teaspoons vanilla extract
-2 1/2 cups AP flour
-1 teaspoon salt
-1 teaspoon baking soda
-1 teaspoon baking powder
-1/2 bag M&M's 

Directions:
Cream together the butter and sugars in a mixer. Add the eggs and vanilla, making sure to scrape down the sides of the mixing bowl. Add the flour, salt, baking soda, and baking powder on low until everything is incorporated.

Chill the dough in the refrigerator for 2 hours.

When ready to bake, preheat the oven to 350 degrees F. Scoop out a 1/4 cup size of dough and roll it into a ball. Roll it around in some M&M's and place on a parchment lined baking sheet. Place 6 cookies on a sheet since they will spread due to their size. Bake for 12-14 minutes until just slightly golden around the edges. Remove from oven and let rest on baking sheet (I let mine rest for about 10 minutes and then moved to a wire rack to finish cooling completely).

*Note* They might look a little underbaked in the center-but don't fear! They will continue to bake a bit once removed from the oven.


Wednesday, February 16, 2011

Better-Than-Crack-Brownies

What else can I say about these fabulous brownies?

I guess the name says it all, although I don't know if they are truly better-than-crack, thank goodness! 

But, what I do know is that these brownies are sinful and are full of pure delicious-ness.

You have a fudgy chocolate brownie, topped with chopped up Butterfingers and Reese's Peanut Butter Cups, which then gets topped off with a mixture of melted chocolate chips, butterscotch chips, and peanut butter and then Cocoa Pebbles cereal gets mixed in! Wow, I know, trust me they are gooooood!

These brownies are chewy and fudgy, crunchy and smooth, and chocolatey and peanut buttery! It's like eating a brownie, a candy  bar, and a scotcheroo all in one!

 I have made these several times and everywhere I take them, they are a huge hit!

Go make these brownies : ), don't wait!

Better-Than-Crack-Brownies: (adapted from How Sweet It Is)

-1 batch brownies for a 13x9-inch pan (boxed or your favorite homemade)
-1/2 cup chopped Butterfingers
-1 cup chopped Reese's Peanut Butter Cups
-3/4 cup milk chocolate chips
-3/4 cup butterscotch chips
-1 1/2 cups creamy peanut butter
-1 1/2 cups Cocoa Pebbles cereal

Make brownies according to directions for a 13x9-inch baking pan. Bake for 20-25 minutes, just so that they are slightly underbaked. Remove and top with chopped Butterfingers and Reese's Peanut Butter Cups, and bake 4-6 minutes more.

While they finish baking, melt chocolate chips, butterscotch chips, and peanut butter together until smooth. Stir in cereal. Remove brownies from oven and evenly pour peanut butter mixture over top.

Refrigerate for 2 hours before serving. I think they taste best cold straight from the refrigerator!

Sunday, February 13, 2011

Chocolate Chip Cookie Confetti Bark

 
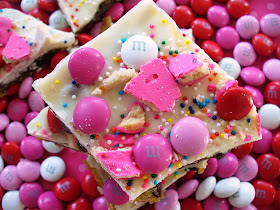
Here is a simple and quick treat perfect for Valentine's Day that you can whip up in a matter of minutes! It is sweet and rich and very addicting and how fun is it?! Chocolate chip cookie dough gets baked and topped with melted white chocolate chips and sprinkled with bright and colorful sprinkles, pink and red Valentine M&M's and frosted animal crackers, which I love! So festive and you can easily change it up for any holiday! I hope you enjoy!

Chocolate Chip Cookie Confetti Bark:

-1 package (16.5 oz.) Nestle Tollhouse Refrigerated Choclate Chip Cookie Bar Dough
-1 (16 oz.) bag white chocolate chips 
-sprinkles
-1 cup frosted animal crackers
-1/2 cupValentine's M&M's

1. Preheat oven to 350 degrees F. Line a 13x9-inch baking pan with aluminum foil and spray with non-stick cooking spray.

2. Place cookie dough in the prepared pan and let soften for 5-10 minutes. Pat dough gently with fingertips to evenly cover bottom of pan (using floured fingers makes it much easier).

3. Bake for 11-13 minutes or until edges are golden brown. Sprinkle white chocolate chips over cookie; bake for an additional 1-2 minutes to melt the white chocolate chips. Immediately spread the melted white chocolate chips evenly over top of the cookie. Distribute sprinkles, frosted animal crackers, and M&M's evenly over top; press down lightly. Refrigerate for 1-2 hours or until the chocolate has hardened. Remove the foil from the pan and break into pieces. Enjoy <3!


Sunday, February 6, 2011

Fudgy Cherry Cordial M&M Cookies

Valentine's Day is just around the corner and who doesn't love it? Well unfortunately, I do know some people who don't love Valentine's Day and one of those people is my boyfriend. He thinks it is just a stupid made up hallmark holiday! I on the other hand love Valentine's Day! I remember when I was little, we got to make little mailboxes out of milk cartons and decorate them all out in red and pink and hearts so that when our Valentine's Day party came around we all had our own special mailbox to get filled with valentine cards from our friends. I remember how fun it was passing out valentines and then opening each and every valentine. Now, I love that Valentine's Day is all about chocolate, pink and red sparkly decorations, cute stuffed animals, and spending time with the one that you love! Even though my boyfriend doesn't believe in Valentine's Day, he still treats me well! One year he came over and surprised me with a heart shaped box of turtle candy which is my favorite, a teddy bear, and flowers! How sweet, don't ya think?

I love chocolate covered cherries so when I saw a bag of these Cherry Cordial M&M's at target I knew I had to try them, and they were actually really good. So, I decided to make some cookies with them and I thought that a chocolate cookie would be the perfect combination. I used a chocolate cookie recipe from my mom which is for chocolate crinkle cookies that you usually roll in powdered sugar, but, I just omitted rolling them in powdered sugar and added the M&M's. These cookies turned out great! They are super fudgy and chocolatey and taste a lot like a brownie with a hint of cherry flavor from the M&M's. These are perfect for Valentine's Day and if you can't find the cherry cordial M&M's you can just use regular M&M's!

Fudgy Cherry Cordial M&M Cookies:

-1/2 cup vegetable oil
-3/4 cup plus 1 tablespoon cocoa powder
-2 cups sugar
-4 eggs
-2 teaspoons vanilla
-2 cups flour
-2 teaspoons baking powder
-1/2 teaspoon salt
-2 cups Cherry Cordial M&M's

In a stand mixer or with an electric mixer, mix oil, cocoa, and sugar until well blended. Blend in one egg at a time until well mixed. Add vanilla. Stir flour, baking powder, and salt into oil mixture. Fold in the Cherry Cordial M&M's. Chill for several hours.

Drop a heaping tablespoon of dough onto a greased baking sheet. Bake at 350 degrees for 8-10 minutes.


Wednesday, February 2, 2011

Hostess "Ho Ho" Cake

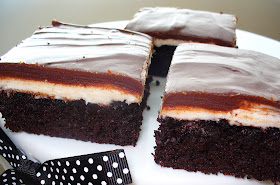
This super easy Hostess "Ho Ho" Cake is a great way to bring back fond childhood memories! Which of these was your favorite hostess snack to get in your lunch? Mine was the Hostess Cupcake, and I think I will just have to make a homemade version of those sometime soon as well!
I made this cake to take over to my aunt who just had shoulder surgery. She is a huge chocolate fan and I thought that this cake would be perfect for her! A moist chocolate cake with a super sweet and creamy vanilla buttercream filling and a chocolate glaze! What is there not to love about this cake? It was a huge hit!
"Ho Ho" Cake: (adapted from How Sweet It Is)

For the cake:
-1 box of your chocolate cake mix, plus the ingredients called for on the box or use your favorite chocolate cake recipe (this is mine

1. Preheat oven to 350 degrees F. Spray a jelly roll pan with non-stick cooking spray, set aside. Prepare chocolate cake according to package directions. Pour batter into prepared pan and spread around until it's even. Bake for 15-20 minutes.

Remove cake and let cool for 30 minutes. While cake is cooling, prepare the middle layer.
 
For the middle layer:
-1/2 cup butter, softened
-1/2 cup vegetable shortening
-4 cups powdered sugar
-2-3 tablespoons milk

Cream butter and shortening in a large mixing bowl. Gradually add remaining ingredients and beat until mixture is thick, combined, and spreadable. Spread in an even layer on the chocolate cake. Set in the freezer for 15 minutes while you make the chocolate glaze.

For the chocolate glaze:
-1/2 cup butter
-1/2 cup cocoa powder
-2 cups powdered sugar
-2-4 tablespoons milk

In a medium size pot, melt the butter over medium heat. Add the cocoa powder and whisk until smooth. Remove from heat and mix in the powdered sugar and milk. Remove cake from freezer and evenly frost with the glaze. Store in the refrigerator.


Tuesday, February 1, 2011

Peanut Butter Candy Pie


I love it when someone's birthday comes around because I get to make a decadant and over-the-top dessert, which I love doing! Last week was my cousin's 22nd birthday and we celebrated with dinner and this Peanut Butter Candy Pie that I made. One of his favorite candy bars are reese's peant butter cups, so, I chose a dessert that incorporated them in it!

This pie starts off with a chocolate oreo cookie crust that gets sprinkled with chopped up peanut butter cups and then on top of that is a peanut butter filling, which is a mixture of cream cheese, peanut butter, powdered sugar, and freshly whipped cream. To top it off, I sprinkled colorful peanut M&M's on top! It is layerd with many textures; crunchy, smooth, creamy and it is rich, peanut buttery and nutty. It tastes kind of like a peanut butter cheesecake, but, it is much lighter due to the whipped cream that gets folded into it. There are a few steps in making this pie, but, it is really so simple to make, it looks impressive, and it is delicious! Everyone loved it!

Peanut Butter Candy Pie:

Ingredients:
For the crust:
-20 Oreo cookies, finely crushed or ground in a food processor
-4 tablespoons butter, melted

For the Pie:
-1 1/2 cups miniature peanut butter cup candies, roughly chopped
-8 ounces cream cheese, softened
-3/4 cup powdered sugar, plus 2 tablespoons, divided
3/4 cup creamy peanut butter
-1 cup heavy whipping cream
-1 teaspoon vanilla extract
-Peanut M&M's, chopped, for garnish

Directions:
1. Preheat oven to 350 degrees F. Line the bottom of a 9-inch springform pan with parchment paper and spray with non-stick cooking spray. 

2. To make the crust, stir Oreo cookie crumbs and butter in a small bowl until moistened. Press the crumbs evenly into the bottom of the springform pan. Bake for 8-10 minutes, then transfer to a rack to cool completely.

3. When the crust is completely cooled, sprinkle with chopped peanut butter cups.

4. To make the pie, combine the cream cheese, 3/4 cups powdered sugar and the peanut butter in a large bowl until the mixture is light and fluffy, about 3 minutes.

5. In a seperate bowl, whip the heavy cream until light and thick. Add the 2 tablespoons of powdered sugar and the vanilla extract. Continue to whip until stiff peaks form.

6. Carefully fold the whipped cream into the peanut butter mixture. Pour batter into the springform pan and refrigerate for at least 4 hours.

7. When ready to serve, sprinkle the top with chopped peanut M&M's.