Thursday, January 27, 2011

Funfetti Birthday Cake Batter Dip!

I am so excited to share this Funfetti Birthday Cake Batter Dip with you! It is just so fun and bright and who doesn't love colorful sprinkles?! I came up with this idea after making the Chocolate Chip M&M Cookie Dough Dip, which was a huge hit! As I have mentioned before I absolutely love anything that is cake batter flavored; cake batter ice cream, which is still on my list of things to make and this yummy cake batter bark, just to name a couple. So, I am always looking for ways to make something cake batter flavored!   
And let me tell you this dip is spot on! It tastes exactly like cake batter! And once again, everyone loved it and it was devoured in about 10 minutes! Most of them liked it even better than the Chocolate Chip M&M Cookie Dough Dip, and they really liked that. This would be perfect for any birthday or even for a superbowl party. It is so simple and quick to make, very portable, and perfect for dipping. I hope you enjoy this as much as we did! We ate it with vanilla wafers but choose whatever you like for your dippers.
Funfetti Cake Batter Dip:

Ingredients:
-1/2 cup (1 stick) butter, melted and cooled
-1 (8-ounce) package cream cheese, softened
-1/2 cup powdered sugar
-1 cup Pillsbury Funfetti Cake Mix
-1 teaspoon vanilla
-1 tablespoon sprinkles

Directions:
1. Melt butter in microwave and set aside to cool.

2. Beat the cream cheese, powdered sugar, and cake mix together for 2 minutes with an electric mixer.

3. Add the vanilla and slowly beat in the cooled butter and beat for another 2 minutes.

4. Stir in the sprinkles.

5. Pour into a serving bowl and refrigerate.

6. Garnish with additional sprinkles, if desired.

 Serve with vanilla wafers or your choice of dippers!

*After being refrigerated it gets hard, so let it soften about 15 minutes before serving.
Dig in!

Monday, January 24, 2011

Candy Bar Stuffed Chocolate Chip Cookies

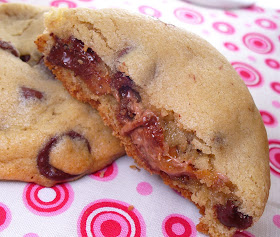
Get a load of these giant cookies! This is yet another fabulous recipe created by Jenny from Picky Palate. You take chocolate chip cookie dough and place a big scoop on the top of your favorite fun size candy bar and place a nice big scoop on the bottom then seal the edges up and bake. The result is a classic buttery, chewy, and perfectly crisp edged chocolate chip cookie with a melty, gooey, and chocolately surprise center!
My candy bars of choice were Snickers, Reese's Peanut Butter Cups, and Milky Ways, but any fun size candy bar would work great, just choose your favorites!
Here's the inside of the Snickers stuffed cookie,
and the inside of the Reese's Peanut Butter Cup cookie,
and finally the Milky Way stuffed cookie, my favorite!

Candy Bar Stuffed Chocolate Chip Cookies: (Picky Palate)
Makes abour 24 large cookies

-2 sticks butter, softened
-1 cup granulated sugar
-3/4 cup brown sugar
-2 large eggs
-1 tablespoon pure vanilla extract
-3 1/2 cups all-purpose flour
-1 teaspoon baking soda
-1/2 teaspoon salt
-10 oz. bag chocolate chips
-variety of fun sized candy bars, about 24

1. Preheat oven to 350 degrees F. In a stand or electric mixer, cream together the butter and sugars until well combined. Add eggs and vanilla until well combined.

2. Place flour, baking soda, and salt in a large bowl; mix and then slowly add to the wet ingredients. Add chocolate chips to combine. Using a cookie scoop, take one scoop of cookie dough and place on top of candy bar. Take another scoop of dough and place on bottom of candy bar. Seal edges together by pressing and cupping in hand until candy is enclosed with dough. Place on parchment or silpat lined baking sheet and bake 9-13, or until cookies are baked to your liking. Let cool for 5 minutes and then transfer to a wire rack to cool completely.

Thursday, January 20, 2011

Fudgey Frosted Brookie Bars

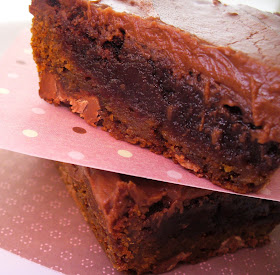
When I saw these Brookies over at Bakingdom, which I am calling Fudgey Frosted Brookie Bars, I just about drooled and I made them the very next day! Brookies, which are part chocolate chip cookie, which I love, and part brownie, which I love even more, are turned into a tri-level decadant treat! You have a buttery and chewy chocolate chip cookie base, topped with a dense and fudgey brownie, topped with a smooth and rich chocolate buttercream. I love, love, love them! Give these a try and if you like these, you may also like these, these or this!
Brookie Bars=pure decadance, indulgence, and are simply irresistable : )
Fudgey Frosted Brookie Bars: (adapted from Bakingdom)

Ingredients:

For the Cookie Layer
-3/4 cup all-purpose flour
-1/2 teaspoon baking powder
-1/2 teaspoon salt
-6 tablespoons unsalted butter, melted and cooled
3/4 cup brown sugar
-1 egg
-1 teaspoon vanilla extract
-1/2 cup milk chocolate chips

For the Brownie Layer
-1/2 cup (1 stick) unsalted butter
-1 cup sugar
-2 eggs
-1 teaspoon vanilla extract
-1/3 cup cocoa powder
-1/2 cup flour
-1/4 teaspoon salt
-1/4 teaspoon baking powder
OR
use your favorite boxed brownie mix plus the ingredients called for on the box (if using a boxed mix, be sure you use a mix for an 8x8-inch pan, not for a 13x9-inch pan).

For the Frosting
-4 tablespoons unsalted butter
-1/4 cup cocoa powder
-2 cups powdered sugar
-2-6 tablespoons milk
-1/2 teaspoon vanilla extract

Preheat oven to 350 degrees F. Spray a 9x9-inch baking dish with non-stick cooking spray.

Make the cookie layer first: In a small bowl, combine the flour, baking powder, and salt; set aside.

In a medium bowl, whisk the melted butter and brown sugar together. Add the egg and vanilla and mix until well combined. Fold in the flour mixture until just combined (be careful not to overmix). Fold in the chocolate chips and spread the batter into the prepared pan. Bake 15-20 minutes, or until lightly golden on top.

Make the brownie layer: While the cookie layer bakes, prepare the brownie batter. In a medium saucepan, melt the butter. Once melted, remove from heat and whisk in the sugar until combined.

Add the eggs, one at a time, mixing well after each addition. Stir in the vanilla.

Whisk in the dry ingredients until combined. Once the cookie layer comes out of the oven, immediately pour the brownie batter on top of the baked cookie layer and return to the oven. OR, prepare boxed mix according to package directions and immediately pour over baked cookie layer and return to the oven.

Bake 20-30 minutes more, or until a toothpick inserted in the center comes out with a few moist crumbs. Cool completely on a wire rack and then frost as desired.

To make the frosting: In a microwaveable medium size bowl, melt the butter. Stir in the cocoa powder until combined. Mix in the powdered sugar and milk alternately until you reach your desired consistency. Stir in the vanilla.

Wednesday, January 19, 2011

Oreo Truffle Surprise Cookies

These cookies sure do have a yummy surprise in the middle!
On the outside they look like regular chocolate chip cookies, but, then you take a bite and surprise! The inside is filled with a tasty cookies n' cream truffle center. All you need to jazz up a good ol' chocolate chip cookie is your favorite chocolate chip cookie recipe, some coarsely chopped up oreos and a bit of softened
cream cheese. Yummy! I found this fabulous recipe from Jenny over at Picky Palate.
Be sure to check out Picky Palate, where you can find the complete recipe right here, the only adaptations I made to the recipe was using chocoate cream filled Oreos because that's what I had on hand!

Tuesday, January 11, 2011

Cranberry Almond Cake

I made a delicious Cranberry Almond Cake, but, unfortunately my pictures didn't turn out. Usually when that happens I don't post the recipe,but, this cake was too good to not share with you, so, I am blogging about it anyways! I found the recipe from one of my favorite blogs, Lick The Bowl Good, be sure to check out Monica's blog, she always has wonderful recipes and photos, and then you can see what this cake looks like!

This cake caught my eye because we had a bag of fresh cranberries in our fridge leftover from the holidays that needed to be used up and I had slivered almonds that I bought for a different recipe that I never ended up making. Perfect! I had all the ingredients and the cake seemed very simple to make, and it was! The cake reminded me of a coffeecake, it was incredibly moist and tender and it was filled with fresh tart cranberries which complemented the sweetness of the cake, and then it was topped off with a sweet and crunchy brown sugar and almond topping. Everyone loved it and it is perfect for dessert, breakfast, or a snack!

The only problem that I had with this cake is that it took much longer to bake than the recipe states, so I followed Monica's advice and upped the temperature to 325 degrees after about 1 hour and 30 minutes and baked it for about 10-15 minutes more and then it was done.

Cranberry Almond Cake:

For the Streusal:

-1 cup slivered almonds
-2 tablespoons unsalted butter, melted
-2 tablespoons light brown sugar, packed

For the Cake:

-2 cups all-purpose flour
-1 teaspoon baking powder
-1/4 teaspoon salt
-3 large eggs
-2 cups granulated sugar
-3/4 cup butter, melted and cooled
-1 teaspoon pure vanilla extract
-1 bag (12 oz.) fresh cranberries

Make the Streusal: Preheat oven to 300 degrees F. Grease a 10-inch round springform pan.

Combine the almonds, butter and brown sugar in a medium bowl. Work the mixture between your fingers to form large crumbs. Refrigerate until ready to use.

Make the Cake: Whisk together the flour, baking powder and salt in a medium bowl, set aside. Combine the eggs and granulated sugar in a large mixing bowl and beat with an electric mixer on medium high speed until the mixture is lightened and increased in volume, about 5 minutes.

With the mixer on low, add the butter in a slow stream. Turn the mixer to medium speed and beat for another 2 minutes. Stir in the vanilla.

Gently but thoroughly fold in the flour mixture, 1/2 cup at a time. Stir in the cranberries.

Scrape the batter into prepared pan, smoothing the top with a spatula. Sprinkle the streusal over the batter. Bake the cake until it is golden and a toothpick inserted in the center comes out clean, 1 hour to 1 hour and 10 minutes (mine took over 1 hour and 30 minutes).

Let the cake cool in pan on a cooling rack for 10 minutes. Release the sides of the pan and use a large spatula to slide the cake from the pan bottom to a wire rack. Cool completely, cut into wedges and serve.

Store uneaten cake in a cake keeper or wrap in plastic wrap and store at room temperature for up to 5 days.


Thursday, January 6, 2011

Jumbo Peanut Butter Cup Cookies

I found these cute mini chocolate covered peanut butter cups at Trader Joe's, which is such a cool store! I wish we had one closer to us, but the closest one is an hour and a half away : ( boo! But, if you are ever  near a Trader Joe's make sure and stop in and check it out, I always find some kind of treasure there! When I saw these mini chocolate covered peanut butter cups there I knew exactly what I wanted to make, and that was an extra large and chewy peanut butter cookie loaded with mini peanut butter cups and chocolate chips....so here it is! By the way, if you don't live near a Trader Joe's, I just saw that HERSHEY's just came out with these extra mini peanut butter cups too, no unwrapping! Enjoy!
                                  Jumbo Peanut Butter Cup Cookies: (adapted from allrecipes)

Ingredients:
-1/2 cup butter, softened
-1/2 cup shortening
-3/4 cup creamy peanut butter
-3/4 cup granulated sugar
-3/4 cup packed brown sugar
-2 eggs
-1 teaspoon vanilla extract
-2 1/3 cups all-purpose flour
-1 teaspoon baking soda
-1 1/2 cups milk chocolate chips
-1 1/2 cups mini chocolate cover peanut butter cups, or regular size peanut butter cups chopped

Directions:
1. Preheat oven to 350 degrees F.

2. In a large bowl, cream together the butter, shortening, peanut butter, and both sugars until smooth. Beat in eggs one at a time, then stir in the vanilla. Combine the flour and baking soda; stir into the peanut butter mixture. Mix in the chocolate chips and mini peanut butter cups. Measure out  a 1/4 cup dough for each cookie and drop dough onto ungreased cookie sheets.

3. Bake for 10-15 minutes. Let cool for one to two minutes on baking sheet before removing onto cooling rack to cool completely.

Tuesday, January 4, 2011

Monkey Bread Muffins


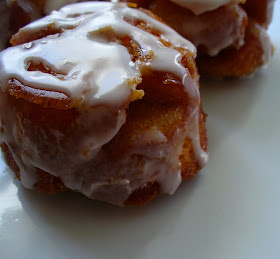
Oh how I love monkey bread and oh how I love breakfast, I could eat it for any meal! So, monkey bread for breakfast equals perfection in my book! I decided to make them into cute little monkey muffins this time, perfect and adorable for individual servings. I first heard of monkey bread from Pillsbury, so I just adapted their recipe to suit my likings!


All you do is take a two cans of pillsbury buttermilk biscuits, cut them into quarters, roll them in melted butter, and then into a mixture of brown sugar and cinnamon, and then place into muffin tins, bake, and in no time you have a delicious treat to nibble on! While the muffins are baking all you need to do is whip up a powdered sugar glaze, which makes these soooo yummy!

These little monkey muffins are so fun and so tasty and are meant to be served warm so the biscuit pieces can be easily torn apart and eaten with your fingers! These little babies melt in your mouth and are deliciously sticky and gooey. While they are baking up, the butter and sugar melts together creating a caramelly glaze. They are sweet and cinnamony and the glaze is just a wonderful topping which melts into all the cracks of the muffins. Be sure to give these a try, they are very addicting and so easy to make!


Monkey Bread Muffins:

Muffins:
-2 cans Pillsbury Buttermilk Biscuits
-1 cup light brown sugar
-2 teaspoons cinnamon
-1/2 cup (1 stick) butter, melted

Glaze:
-1 cup powdered sugar
-2 tablespoons milk

1. Preheat oven to 350 degrees F. Spray 2 muffin tins with non-stick cooking spray (this makes about 15 muffins).

2. Cut each biscuit into quarters.

3. In a bowl, mix together the brown sugar and cinnamon. Melt the butter in a seperate bowl.

4. Working with one at a time, roll each biscuit quarter into butter and then roll in the cinnamon and sugar mixture. Place 5-6 biscuit quarters in each muffin tin.

5. Bake 12-15 minutes.

6. Cool for 5 minutes in the muffin tin; remove and drizzle each muffin with the glaze.

7. For the glaze: While the muffins are cooling combine the powdered sugar and milk until smooth.

Sunday, January 2, 2011

Chocolate Chip M&M Cookie Dough Dip


Who doesn't love eating raw cookie dough by the spoonful? I think one of the best parts of making cookies is getting to taste the dough before it is baked. I remember sneaking spoonful after spoonful of cookie dough when I was little while my mom was making cookies, I just couldn't help myself! I also love tasting spoonfuls of brownie batter and cake batter, and two of my favorite ice cream flavors are cake batter ice cream and chocolate chip cookie dough. One time, Dairy Queen even had a brownie batter blizzard! Yummy! Cake batter ice cream and brownie batter ice cream are on my list of things to make.


 When I saw this recipe two times in  one week I knew I had to give it a try! And this turned out to be one seriously delicious and addicting dip! Doesn't it look exactly like cookie dough? It was so delicious that it was literally devoured in about 5 minutes by some of my cousins! It is so rich and sweet, creamy and smooth, and has a great caramelly brown sugar flavor that you get from cookie dough. It is studded with adorable mini chocolate chips and mini M&M's. This dip is so fun and playful and perfect for any occasion, dessert, or for just just eating by the spoonful to satisfy a cookie dough craving! It takes no time to whip up and there are endless dipper possibilites to choose from. I served the dip with graham crackers, marshmallows, and chocolate covered graham crackers, which was the favorite dipper choice by far! I also think it would also be tasty with oreos, teddy grahams, Nilla wafers, pretzals, chocolate covered pretzals, and mini brownie chunks. I am definetly going to try it sandwhiched between two soft and chewy chocolate chip cookies and as a frosting for fudgey brownies, kind of like these brownies that I really enjoyed. I found this recipe on one of my favorite blogs, Brown Eyed Baker, and then I also saw it here, on How Sweet It Is, who took this dip to another level by creating three other fabulous cookie dough dip flavors! Her Cookie Dough Dip Trio includes Snickerdoodle, Peanut Butter, and Double Chocolate Fudge, which is the one I want to try next. Enjoy!


Chocolate Chip M&M Cookie Dough Dip: (adapted from Brown Eyed Baker)

-1/2 cup (1 stick) melted butter
-1/3 cup brown sugar
-1 teaspoon vanilla extract
-1 (8-ounce) package of cream cheese, softened
-1/2 cup powdered sugar
-1/2 cup semi-sweet mini chocolate chips
-1/4 cup mini M&M's

1. In a small saucepan, melt the butter with the brown sugar over medium heat. Stir continuously, until the brown sugar dissolves.

2. Remove from heat and whisk in vanilla extract, and set aside to cool.

3. Beat the cream cheese and powdered sugar for 1 minute.

4. Slowly beat in the cooled butter mixture and beat again for another minute.

5. Stir in the chocolate chips and M&M's.

6. Pour into a serving bowl and refrigerate.

7. Garnish with additional chocolate chips and M&M's, if desired.

Serve with graham crackers, chocolate covered graham crackers, Nilla wafers, marshmallows, Oreos, mini brownies, teddy grahams, etc., anything you want!

**NOTE: after refrigerating the dip, it will be pretty solid and un-dippable so make sure to remove it from the refrigerator about 15-30 minutes before serving it, so it has time to soften up.

Saturday, January 1, 2011

Happy New Year! And Delightful Raisin Bran Muffins

Happy New Year! Can you believe how fast the year went? I sure can't! So, now it is the time for your New Year's resolutions. Do you have any? My New Year's resolution is to start going to the gym since I do have a lifetime membership, and build up some muscle! I could use a little bit more muscle on my bones.

Many New Year's resolutions are to start eating more healthy after all of the holiday eating that took place from October to December, so I baked up some healthy, hearty and delicious Raisin Bran cereal muffins which are perfect for breakfast or as a snack. 
I happen to love eating Raisin Bran cereal for breakfast; the sugary, sweet and chewy raisins combined with the slightly sweetened crunchy bran flakes is a perfect and yummy combination. So, when I saw this bran muffin recipe over at Brown Eyed Baker, which included one of my favorite cereals, I was so excited to try it out! They turned out just as I expected! They are hearty and moist and have the perfect balance of sweetness in them. Be sure to give these a try whether you like Raisin Bran or not! I think you will be surprised! Plus, they are healthy so it's a great way to start your New Year's resolutions!
Raisin Bran Muffins: (Brown Eyed Baker) Yield: 12 muffins

-1 1/2 cups all-purpose flour
-1/2 teaspoon baking soda
-1/4 teaspoon salt
-1/3 cup sugar
-3 tablespoons light brown sugar
-2 1/2 cups Raisin Bran cereal
-1/3 cup vegetable oil
-1 egg
-1 1/4 cup buttermilk
-1/2 teaspoon vanilla extract

1. Preheat oven to 375 degrees F. Line muffin tin with paper liners or spray with non-stick cooking spray.

2. In a large bowl whisk together the flour, baking soda, salt, and sugar. Stir in the cereal; set aside.

3. In a medium bowl, whisk together the oil, egg, buttermilk, and vanilla extract.

4. Pour the wet ingredients over the dry ingredients, and stir until completely combined. Allow the mixture to sit at room temperature for at least 45 minutes (this allows the cereal to soften in the batter). If you don't want to use it immediately, you can refrigerate in an airtight container for up to 3 days.

5. When ready to bake, divide the batter evenly between the 12 muffins tins. Sprinkle the tops with granulated sugar.

6. Bake for 15-20 minutes, or until a thin knife inserted in the center comes out clean. Store in an airtight container for up to two days, and then in the refrigerator for up to another week.