Showing posts with label Candy. Show all posts

Wednesday, July 27, 2011

Fudgey Cocoa No-Bake Treats with M&M's


Apparently, I have been into baking with oatmeal lately! This is the third recipe in a row that I have baked where oatmeal has been the main ingredient. Maybe because oatmeal is healthy!...and if there is oatmeal in your dessert then you can eat more, since oatmeal is good for you :) Here's the line-up of the other two recipes that I made; these Chocolate Chip Oatmeal Cookies are perfectly delicious, chewy, and are now my go to recipe for any type of oatmeal cookie. The add-ins are endless! And, this Vanilla Scented Granola is crunchy and sweet and perfect for breakfast or as a quick snack on the go.

These Fudgey Cocoa No-Bake Treats are slightly adapted from my HERSHEY'S Best-Loved Recipes cook book. I love this cook book! I am a chocolate lover and none of their recipes ever disappoint! These  are a quick and easy sweet treat that are made in a matter of minutes with simple ingredients that you probably have on hand. Sugar, butter, milk, and cocoa are cooked together until boiling on the stove top and then  peanut butter, oats, and vanilla are mixed in.  This is a perfect drop cookie resulting in a sugary little mound of fudgey, chocolatey, peanut buttery, and hearty goodness. I added M&M's for a little color and believe me these babies are addictive!  


Fudgey Cocoa No-Bake Treats with M&M's:

  • 2 cups sugar
  • 1/2 cup (1 stick) butter
  • 1/2 cup milk
  • 1/3 cup Cocoa
  • 2/3 cup peanut butter (smooth or crunchy)
  • 3 cups quick-cooking rolled oats
  • 1/2 cup chopped peanuts (optional)
  • 2 teaspoons vanilla extract
  • handful of M&M's
1. Place a piece of wax paper or foil on a cookie sheet. Combine sugar, butter, milk and cocoa in medium sauepan.

2. Cook over medium heat, stirring constantly, until mixture comes to a rolling boil. Boil for 90 seconds.

3. Remove from heat and add peanut butter, oats, peanuts, if desired, and vanilla; stir to mix well. Quickly drop mixture by heaping tablespoons onto wax paper or foil and top each with M&M's. Cool completely. Store in cool, dry place.


Wednesday, February 16, 2011

Better-Than-Crack-Brownies

What else can I say about these fabulous brownies?

I guess the name says it all, although I don't know if they are truly better-than-crack, thank goodness! 

But, what I do know is that these brownies are sinful and are full of pure delicious-ness.

You have a fudgy chocolate brownie, topped with chopped up Butterfingers and Reese's Peanut Butter Cups, which then gets topped off with a mixture of melted chocolate chips, butterscotch chips, and peanut butter and then Cocoa Pebbles cereal gets mixed in! Wow, I know, trust me they are gooooood!

These brownies are chewy and fudgy, crunchy and smooth, and chocolatey and peanut buttery! It's like eating a brownie, a candy  bar, and a scotcheroo all in one!

 I have made these several times and everywhere I take them, they are a huge hit!

Go make these brownies : ), don't wait!

Better-Than-Crack-Brownies: (adapted from How Sweet It Is)

-1 batch brownies for a 13x9-inch pan (boxed or your favorite homemade)
-1/2 cup chopped Butterfingers
-1 cup chopped Reese's Peanut Butter Cups
-3/4 cup milk chocolate chips
-3/4 cup butterscotch chips
-1 1/2 cups creamy peanut butter
-1 1/2 cups Cocoa Pebbles cereal

Make brownies according to directions for a 13x9-inch baking pan. Bake for 20-25 minutes, just so that they are slightly underbaked. Remove and top with chopped Butterfingers and Reese's Peanut Butter Cups, and bake 4-6 minutes more.

While they finish baking, melt chocolate chips, butterscotch chips, and peanut butter together until smooth. Stir in cereal. Remove brownies from oven and evenly pour peanut butter mixture over top.

Refrigerate for 2 hours before serving. I think they taste best cold straight from the refrigerator!

Sunday, February 13, 2011

Chocolate Chip Cookie Confetti Bark

 
Here is a simple and quick treat perfect for Valentine's Day that you can whip up in a matter of minutes! It is sweet and rich and very addicting and how fun is it?! Chocolate chip cookie dough gets baked and topped with melted white chocolate chips and sprinkled with bright and colorful sprinkles, pink and red Valentine M&M's and frosted animal crackers, which I love! So festive and you can easily change it up for any holiday! I hope you enjoy!

Chocolate Chip Cookie Confetti Bark:

-1 package (16.5 oz.) Nestle Tollhouse Refrigerated Choclate Chip Cookie Bar Dough
-1 (16 oz.) bag white chocolate chips 
-sprinkles
-1 cup frosted animal crackers
-1/2 cupValentine's M&M's

1. Preheat oven to 350 degrees F. Line a 13x9-inch baking pan with aluminum foil and spray with non-stick cooking spray.

2. Place cookie dough in the prepared pan and let soften for 5-10 minutes. Pat dough gently with fingertips to evenly cover bottom of pan (using floured fingers makes it much easier).

3. Bake for 11-13 minutes or until edges are golden brown. Sprinkle white chocolate chips over cookie; bake for an additional 1-2 minutes to melt the white chocolate chips. Immediately spread the melted white chocolate chips evenly over top of the cookie. Distribute sprinkles, frosted animal crackers, and M&M's evenly over top; press down lightly. Refrigerate for 1-2 hours or until the chocolate has hardened. Remove the foil from the pan and break into pieces. Enjoy <3!


Tuesday, February 1, 2011

Peanut Butter Candy Pie


I love it when someone's birthday comes around because I get to make a decadant and over-the-top dessert, which I love doing! Last week was my cousin's 22nd birthday and we celebrated with dinner and this Peanut Butter Candy Pie that I made. One of his favorite candy bars are reese's peant butter cups, so, I chose a dessert that incorporated them in it!

This pie starts off with a chocolate oreo cookie crust that gets sprinkled with chopped up peanut butter cups and then on top of that is a peanut butter filling, which is a mixture of cream cheese, peanut butter, powdered sugar, and freshly whipped cream. To top it off, I sprinkled colorful peanut M&M's on top! It is layerd with many textures; crunchy, smooth, creamy and it is rich, peanut buttery and nutty. It tastes kind of like a peanut butter cheesecake, but, it is much lighter due to the whipped cream that gets folded into it. There are a few steps in making this pie, but, it is really so simple to make, it looks impressive, and it is delicious! Everyone loved it!

Peanut Butter Candy Pie:

Ingredients:
For the crust:
-20 Oreo cookies, finely crushed or ground in a food processor
-4 tablespoons butter, melted

For the Pie:
-1 1/2 cups miniature peanut butter cup candies, roughly chopped
-8 ounces cream cheese, softened
-3/4 cup powdered sugar, plus 2 tablespoons, divided
3/4 cup creamy peanut butter
-1 cup heavy whipping cream
-1 teaspoon vanilla extract
-Peanut M&M's, chopped, for garnish

Directions:
1. Preheat oven to 350 degrees F. Line the bottom of a 9-inch springform pan with parchment paper and spray with non-stick cooking spray. 

2. To make the crust, stir Oreo cookie crumbs and butter in a small bowl until moistened. Press the crumbs evenly into the bottom of the springform pan. Bake for 8-10 minutes, then transfer to a rack to cool completely.

3. When the crust is completely cooled, sprinkle with chopped peanut butter cups.

4. To make the pie, combine the cream cheese, 3/4 cups powdered sugar and the peanut butter in a large bowl until the mixture is light and fluffy, about 3 minutes.

5. In a seperate bowl, whip the heavy cream until light and thick. Add the 2 tablespoons of powdered sugar and the vanilla extract. Continue to whip until stiff peaks form.

6. Carefully fold the whipped cream into the peanut butter mixture. Pour batter into the springform pan and refrigerate for at least 4 hours.

7. When ready to serve, sprinkle the top with chopped peanut M&M's.

Monday, January 24, 2011

Candy Bar Stuffed Chocolate Chip Cookies

Get a load of these giant cookies! This is yet another fabulous recipe created by Jenny from Picky Palate. You take chocolate chip cookie dough and place a big scoop on the top of your favorite fun size candy bar and place a nice big scoop on the bottom then seal the edges up and bake. The result is a classic buttery, chewy, and perfectly crisp edged chocolate chip cookie with a melty, gooey, and chocolately surprise center!
My candy bars of choice were Snickers, Reese's Peanut Butter Cups, and Milky Ways, but any fun size candy bar would work great, just choose your favorites!
Here's the inside of the Snickers stuffed cookie,
and the inside of the Reese's Peanut Butter Cup cookie,
and finally the Milky Way stuffed cookie, my favorite!

Candy Bar Stuffed Chocolate Chip Cookies: (Picky Palate)
Makes abour 24 large cookies

-2 sticks butter, softened
-1 cup granulated sugar
-3/4 cup brown sugar
-2 large eggs
-1 tablespoon pure vanilla extract
-3 1/2 cups all-purpose flour
-1 teaspoon baking soda
-1/2 teaspoon salt
-10 oz. bag chocolate chips
-variety of fun sized candy bars, about 24

1. Preheat oven to 350 degrees F. In a stand or electric mixer, cream together the butter and sugars until well combined. Add eggs and vanilla until well combined.

2. Place flour, baking soda, and salt in a large bowl; mix and then slowly add to the wet ingredients. Add chocolate chips to combine. Using a cookie scoop, take one scoop of cookie dough and place on top of candy bar. Take another scoop of dough and place on bottom of candy bar. Seal edges together by pressing and cupping in hand until candy is enclosed with dough. Place on parchment or silpat lined baking sheet and bake 9-13, or until cookies are baked to your liking. Let cool for 5 minutes and then transfer to a wire rack to cool completely.

Thursday, January 6, 2011

Jumbo Peanut Butter Cup Cookies

I found these cute mini chocolate covered peanut butter cups at Trader Joe's, which is such a cool store! I wish we had one closer to us, but the closest one is an hour and a half away : ( boo! But, if you are ever  near a Trader Joe's make sure and stop in and check it out, I always find some kind of treasure there! When I saw these mini chocolate covered peanut butter cups there I knew exactly what I wanted to make, and that was an extra large and chewy peanut butter cookie loaded with mini peanut butter cups and chocolate chips....so here it is! By the way, if you don't live near a Trader Joe's, I just saw that HERSHEY's just came out with these extra mini peanut butter cups too, no unwrapping! Enjoy!
                                  Jumbo Peanut Butter Cup Cookies: (adapted from allrecipes)

Ingredients:
-1/2 cup butter, softened
-1/2 cup shortening
-3/4 cup creamy peanut butter
-3/4 cup granulated sugar
-3/4 cup packed brown sugar
-2 eggs
-1 teaspoon vanilla extract
-2 1/3 cups all-purpose flour
-1 teaspoon baking soda
-1 1/2 cups milk chocolate chips
-1 1/2 cups mini chocolate cover peanut butter cups, or regular size peanut butter cups chopped

Directions:
1. Preheat oven to 350 degrees F.

2. In a large bowl, cream together the butter, shortening, peanut butter, and both sugars until smooth. Beat in eggs one at a time, then stir in the vanilla. Combine the flour and baking soda; stir into the peanut butter mixture. Mix in the chocolate chips and mini peanut butter cups. Measure out  a 1/4 cup dough for each cookie and drop dough onto ungreased cookie sheets.

3. Bake for 10-15 minutes. Let cool for one to two minutes on baking sheet before removing onto cooling rack to cool completely.

Thursday, December 30, 2010

A Delicious Cake For My 100th Post!

Here it is, my 100th post, a Chocolate Butterscotch Butterfinger Cake or how about CBB Cake to shorten it up a bit! And I must say that this cake is a pretty darn fabulous one! I think there are several different names for this type of cake, like, "better then sex chocolate cake" or "Harrison Ford cake", and I guess this cake gets its name because of how utterly delicious and divine it is! And I mean really, really yummy and so easy to make. It is usually made with toffee bits and caramel topping but I switched it up a bit, and here's how I did it, and feel free to swap in your favorites! All you do is make your favorite chocolate cake or make a chocolate cake mix according to directions, then you poke holes all over the hot cake, and pour a super sweet glaze, which is a combination of sweetened condensed milk and butterscotch ice cream topping, all over the cake while it is still warm so the glaze can soak into the cake. Finally, it gets topped with creamy Cool Whip and topped with lots and lots of crispy crushed up Butterfingers.
Sweet, dense, super moist, gooey, creamy, cool, chocolately, butterscotchy, and crunchy all in this one bite is what makes this cake so AMAZING!
Chocolate Butterscotch Butterfinger Cake:

-1 recipe for HERSHEY'S "Perfectly Chocolate" Chocolate Cake, found here, or 1 box of your favorite cake mix
-1 (14-ounce) can sweetened condensed milk
-1 (12-ounce) jar butterscotch topping
-1 (12-ounce) container Cool Whip
-2 regular sized Butterfinger candy bars, crushed

1. Prepare the cake according to directions. Immediately after removing the cake from the oven, poke holes with a wooden skewer or fork liberally all over the cake.

2. In a medium sized bowl, combine the sweetened condensed milk and butterscotch topping and then pour it all over the hot cake.

3. Cool cake completely, then spread Cool Whip over the top, then sprinkle with crushed Butterfingers. Store in an airtight container in the refrigerator.

Tuesday, December 21, 2010

Festive Funfetti Cake Batter Bark


I love, love Funfetti Cake and Funfetti Frosting! It is my absolute favorite, and I don't care that they come from a box and a can : ) I also love anything that is cake batter related! Cake batter ice cream is my all time favorite ice cream flavor hands down! So, when I stumbled upon a recipe for cake batter bark on How Sweet It Is, I was very intrigued and tried it immediately with a few adaptations! I used only white chocolate instead of both white and regular chocolate, I used a festive Funfetti Cake mix instead of yellow cake mix and I added cream and Funfetti Frosting to the mix! I must say this bark turned out really, really tasty and super cute and it is absolutely perfect for holiday gift giving. The only thing I will change about it next time is to add more dry cake mix to pump up the cake batter taste, it needed a little bit more of that flavor!


Enjoy!


Festive Funfetti Cake Batter Bark:

-1 (11-ounce) package vanilla/white chocolate chips
-1/4 cup heavy whipping cream
-1 heaping teaspoon Funfetti Cake mix
-1 heaping tablespoon Funfetti frosting
-sprinkles

1. Line a 8x8-inch baking pan with aluminum foil and spray with non-stick cooking spray, set aside.

2. In a heatproof bowl, microwave the white chocolate chips and the cream in 30 second intervals until completely melted and smooth, about a minute and a half. Immediately stir in the cake mix and the frosting. Pour into the prepared pan and decorate with sprinkles.

3. Refrigerate until it hardens and then break it up into pieces. Store it in an airtight container in the refrigerator.


Tuesday, December 14, 2010

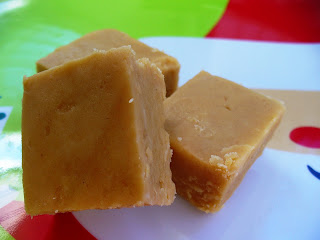
Peanut Butter Fudge


It's that time of year for sweet treats, candy making, and baking and fudge is a popular treat that everyone enjoys! This is a super simple peanut butter fudge recipe, no candy thermometor needed, just a microwave and a wooden spoon! It only takes about 5 minutes to make. Enjoy!

Peanut Butter Fudge: (Recipe Courtesy Alton Brown)

Ingredients:
-1 cup butter
-1 cup peanut butter
-1 teaspoon vanilla
-1 pound powdered sugar (about 3 1/2-3 3/4 cups, I used 3 1/2 cups)

Directions:
Microwave butter and peanut butter for 2 minutes on high. Stir and microwave on high for 2 more minutes. Add vanilla and powdered sugar to peanut butter mixture and stir with a wooden spoon until combined. Pour into a greased 8x8-inch pan. Place a piece of wax paper on the surface of the fudge and refrigerate until cool. Cut into 1-inch pieces and store into an airtight container for up to a week.

Wednesday, November 10, 2010

Chocolate Candy Bar Overload Cake


I wanted to use up some leftover halloween candy and I was also having a craving for a moist and delicious chocolate cake, so, this is what I came up with! A Chocolate Candy bar Overload Cake. Of course, I used my favorite chocolate cake recipe from HERSHEY'S, which turns out perfectly everytime, no joke! It is the best, and then I frosted it with HERSHEY'S "Perfectly Chocolate" Chocolate Frosting recipe slightly modified. I used half regular cocoa and half dark cocoa and I really, really loved the flavor combo of the two. Then, I just sprinkled some chopped candy bars in between the 2 cake layers and then decorated the top with some more candy bars!  This sure hit the spot and satisfied my chocolate cake craving and my whole family couldn't rave about it more! My sister said it was the best chocolate cake she has ever had.

HERSHEY'S "Perfectly Chocolate" Chocolate Cake:
For the Cake:
-2 cups sugar
-1 3/4 cups all-purpose flour
-3/4 cup HERSHEY'S cocoa
-1 1/2 teaspoons baking powder
-1 1/2 teaspoons baking soda
-1 teaspoon salt
-2 eggs
-1 cup milk
-1/2 cup vegetable oil
-2 teaspoons vanilla extract
-1 cup boiling water
-"Perfectly Chocoloate" Chocolate Frosting (recipe below)
-2 mini candy bars, coarsely chopped, and about 6 cut into bigger chunks (any kind will do!)

1. Heat oven to 350 degrees F. Grease and flour two 9-inch round cake pans.
2. Stir together sugar, flour, cocoa, baking powder, baking soda and salt in a large bowl. Add eggs, milk, oil and vanilla; beat on medium speed of mixer 2 minutes. Stir in water. (Batter will be thin). Pour batter into prepared pans.
3. Bake 30 to 35 minutes or until wooden pick inserted in center comes out clean. Cool 10 minutes; remove from pans to wire racks. Cool completely.
4. Prepare frosting; spread between layers and sprinkle with about 2 of the coarsely chopped candy bars. Spread the rest of the frosting over the top and side of the cake. Decorate the top of the cake with the bigger chunks of the candy bars as desired.

"Perfectly Chocolate" Chocolate Frosting: (slightly adapted by me)
-1/2 cup (1 stick) butter
-2/3 cup HERSHEY'S cocoa, (I used 1/3 cup of regular cocoa and 1/3 cup of dark cocoa and I really loved the flavor of the combination of the 2, so I highly reccomend doing that : )!)
-4 cups powdered sugar
-1/2 cup-2/3 cup milk
-1 teaspoon vanilla extract

1. Melt butter. Stir in cocoa. Alternately add powdered sugar and milk, beating to spreading consistency, (I beat it for a few minutes on medium-high speed, which gave it a great texture and made it light and fluffy).
2. Stir in vanilla.


Friday, October 29, 2010

Monster Munch


WARNING: This Halloween treat is highly addictive! This yummy monster munch is the perfect sweet and salty combination. It is filled with sweet, melt-in-your-mouth home made caramel corn, crunchy and chocolately peanut m&m's, cheesy and salty CHEEZ-IT crackers, and my favorite, candy corn! Which I absolutely love because they are just so darn cute and tasty and the perfect Halloween candy! Next time, I want to add pretzals into the mix as well! This is one of those treats that you can make your own and put all of your favorite things in, or a great way to clean out your pantry! I think it would also be perfect to put in cute little Halloween baggies and hand out to all your trick-or-treaters! And remember, I warned you!!!!

Monster Munch:
-1 recipe for caramel corn (recipe below)
-1 (9-ounce) box CHEEZ-IT crackers
-1 (11-ounce) package Autumn Mix Candy Corn
-1 medium bag (12.60-ounce) peanut m&m's

In a large bowl, carefully combine the caramel corn, CHEEZ-IT crackers, candy corn, and peanut m&m's. Store in an airtight container. Enjoy!

Caramel Corn: (adapted from Sugar Cooking)
-3.5 quarts (one large bowl) plain popped popcorn
-1 cup brown sugar
-1/4 cup light corn syrup
-1/2 teaspoon salt
-1/2 cup butter
-1/4 teaspoon baking soda
-1/2 teaspoon vanilla

Directions:
1. Line a large baking sheet with parchment paper or aluminum foil. Preheat oven to 250 degrees F.
2.Make popcorn and place in a larg bowl.
3. Combine the brown sugar, corn syrup, salt, and butter in a saucepan. Bring to a boil over medium heat, stirring enough to blend. Once the mixture begins to boil, boil for 5 minutes while stirring constantly.
4. Remove from heat, and stir in baking soda and vanilla. The mixture will be light and foamy. Immediately pour over the popcorn in the bowl. Stir to coat.
5. Bake for 1 hour, removing the pans, and giving them a good stir every 15 minutes. After it has baked, seperate into pieces if needed. Allow to cool completely and then store in airtight containers or ziploc baggies. 


Thursday, October 28, 2010

Halloween Oreo Truffles


These Oreo Truffles are super simple to make, super tasty, and only call for a few ingredients!

Halloween Oreo Truffles: (Kraft foods)

What You Need:
-1 package (8 ounces) cream cheese, softened
-1 package (1 lb. 2 oz.) OREO cookies, finely crushed, (about 4-1/4 cups), divided
-2 packages (8 squares each) BAKER'S semi-sweet chocolate, melted (I used milk chocolate chips)

Make It:
Mix cream cheese and 3 cups of the cookie crumbs until well combined. Shape into 48 (1-inch) balls. Dip into the melted chocolate (I used a double boiler and 2 spoons to dip them in). Place on a baking sheet covered with aluminum foil or parchment paper. Sprinkle with reserved cookie crumbs or Halloween sprinkles. Refrigerate for at least an hour.

Sunday, May 23, 2010

SMS: Butterscotch Pralines


This is my first Sunday baking with Sweet Melissa Sundays, which is where a group of food bloggers bake our way through The Sweet Melissa Baking Book by Melissa Murphy. Each week a different member chooses a recipe to bake from Melissa's baking book. I am very excited about doing this and can't wait to see how all of Melissa's yummy recipes turn out. Her baking book has tons of great recipes in it! This week, Tessa, from The Cookin' Chemist, chose to make butterscotch pralines, so make sure to check her blog out for the recipe and see how hers turned out. 


Overall, these turned out really, really good and my whole family really enjoyed them. They had a great butterscotch flavor which I love and were really quick to make.  But, I think I should have cooked the sugar a little bit longer because the mixture was a bit thin, and some of my butterscotch pralines were pretty thin, but, they still hardened and tasted great! I will make sure to give these another try sometime and cook the sugar a bit longer!


Showing posts with label Candy. Show all posts

Wednesday, July 27, 2011

Fudgey Cocoa No-Bake Treats with M&M's


Apparently, I have been into baking with oatmeal lately! This is the third recipe in a row that I have baked where oatmeal has been the main ingredient. Maybe because oatmeal is healthy!...and if there is oatmeal in your dessert then you can eat more, since oatmeal is good for you :) Here's the line-up of the other two recipes that I made; these Chocolate Chip Oatmeal Cookies are perfectly delicious, chewy, and are now my go to recipe for any type of oatmeal cookie. The add-ins are endless! And, this Vanilla Scented Granola is crunchy and sweet and perfect for breakfast or as a quick snack on the go.

These Fudgey Cocoa No-Bake Treats are slightly adapted from my HERSHEY'S Best-Loved Recipes cook book. I love this cook book! I am a chocolate lover and none of their recipes ever disappoint! These  are a quick and easy sweet treat that are made in a matter of minutes with simple ingredients that you probably have on hand. Sugar, butter, milk, and cocoa are cooked together until boiling on the stove top and then  peanut butter, oats, and vanilla are mixed in.  This is a perfect drop cookie resulting in a sugary little mound of fudgey, chocolatey, peanut buttery, and hearty goodness. I added M&M's for a little color and believe me these babies are addictive!  


Fudgey Cocoa No-Bake Treats with M&M's:

  • 2 cups sugar
  • 1/2 cup (1 stick) butter
  • 1/2 cup milk
  • 1/3 cup Cocoa
  • 2/3 cup peanut butter (smooth or crunchy)
  • 3 cups quick-cooking rolled oats
  • 1/2 cup chopped peanuts (optional)
  • 2 teaspoons vanilla extract
  • handful of M&M's
1. Place a piece of wax paper or foil on a cookie sheet. Combine sugar, butter, milk and cocoa in medium sauepan.

2. Cook over medium heat, stirring constantly, until mixture comes to a rolling boil. Boil for 90 seconds.

3. Remove from heat and add peanut butter, oats, peanuts, if desired, and vanilla; stir to mix well. Quickly drop mixture by heaping tablespoons onto wax paper or foil and top each with M&M's. Cool completely. Store in cool, dry place.


Wednesday, February 16, 2011

Better-Than-Crack-Brownies

What else can I say about these fabulous brownies?

I guess the name says it all, although I don't know if they are truly better-than-crack, thank goodness! 

But, what I do know is that these brownies are sinful and are full of pure delicious-ness.

You have a fudgy chocolate brownie, topped with chopped up Butterfingers and Reese's Peanut Butter Cups, which then gets topped off with a mixture of melted chocolate chips, butterscotch chips, and peanut butter and then Cocoa Pebbles cereal gets mixed in! Wow, I know, trust me they are gooooood!

These brownies are chewy and fudgy, crunchy and smooth, and chocolatey and peanut buttery! It's like eating a brownie, a candy  bar, and a scotcheroo all in one!

 I have made these several times and everywhere I take them, they are a huge hit!

Go make these brownies : ), don't wait!

Better-Than-Crack-Brownies: (adapted from How Sweet It Is)

-1 batch brownies for a 13x9-inch pan (boxed or your favorite homemade)
-1/2 cup chopped Butterfingers
-1 cup chopped Reese's Peanut Butter Cups
-3/4 cup milk chocolate chips
-3/4 cup butterscotch chips
-1 1/2 cups creamy peanut butter
-1 1/2 cups Cocoa Pebbles cereal

Make brownies according to directions for a 13x9-inch baking pan. Bake for 20-25 minutes, just so that they are slightly underbaked. Remove and top with chopped Butterfingers and Reese's Peanut Butter Cups, and bake 4-6 minutes more.

While they finish baking, melt chocolate chips, butterscotch chips, and peanut butter together until smooth. Stir in cereal. Remove brownies from oven and evenly pour peanut butter mixture over top.

Refrigerate for 2 hours before serving. I think they taste best cold straight from the refrigerator!

Sunday, February 13, 2011

Chocolate Chip Cookie Confetti Bark

 
Here is a simple and quick treat perfect for Valentine's Day that you can whip up in a matter of minutes! It is sweet and rich and very addicting and how fun is it?! Chocolate chip cookie dough gets baked and topped with melted white chocolate chips and sprinkled with bright and colorful sprinkles, pink and red Valentine M&M's and frosted animal crackers, which I love! So festive and you can easily change it up for any holiday! I hope you enjoy!

Chocolate Chip Cookie Confetti Bark:

-1 package (16.5 oz.) Nestle Tollhouse Refrigerated Choclate Chip Cookie Bar Dough
-1 (16 oz.) bag white chocolate chips 
-sprinkles
-1 cup frosted animal crackers
-1/2 cupValentine's M&M's

1. Preheat oven to 350 degrees F. Line a 13x9-inch baking pan with aluminum foil and spray with non-stick cooking spray.

2. Place cookie dough in the prepared pan and let soften for 5-10 minutes. Pat dough gently with fingertips to evenly cover bottom of pan (using floured fingers makes it much easier).

3. Bake for 11-13 minutes or until edges are golden brown. Sprinkle white chocolate chips over cookie; bake for an additional 1-2 minutes to melt the white chocolate chips. Immediately spread the melted white chocolate chips evenly over top of the cookie. Distribute sprinkles, frosted animal crackers, and M&M's evenly over top; press down lightly. Refrigerate for 1-2 hours or until the chocolate has hardened. Remove the foil from the pan and break into pieces. Enjoy <3!


Tuesday, February 1, 2011

Peanut Butter Candy Pie


I love it when someone's birthday comes around because I get to make a decadant and over-the-top dessert, which I love doing! Last week was my cousin's 22nd birthday and we celebrated with dinner and this Peanut Butter Candy Pie that I made. One of his favorite candy bars are reese's peant butter cups, so, I chose a dessert that incorporated them in it!

This pie starts off with a chocolate oreo cookie crust that gets sprinkled with chopped up peanut butter cups and then on top of that is a peanut butter filling, which is a mixture of cream cheese, peanut butter, powdered sugar, and freshly whipped cream. To top it off, I sprinkled colorful peanut M&M's on top! It is layerd with many textures; crunchy, smooth, creamy and it is rich, peanut buttery and nutty. It tastes kind of like a peanut butter cheesecake, but, it is much lighter due to the whipped cream that gets folded into it. There are a few steps in making this pie, but, it is really so simple to make, it looks impressive, and it is delicious! Everyone loved it!

Peanut Butter Candy Pie:

Ingredients:
For the crust:
-20 Oreo cookies, finely crushed or ground in a food processor
-4 tablespoons butter, melted

For the Pie:
-1 1/2 cups miniature peanut butter cup candies, roughly chopped
-8 ounces cream cheese, softened
-3/4 cup powdered sugar, plus 2 tablespoons, divided
3/4 cup creamy peanut butter
-1 cup heavy whipping cream
-1 teaspoon vanilla extract
-Peanut M&M's, chopped, for garnish

Directions:
1. Preheat oven to 350 degrees F. Line the bottom of a 9-inch springform pan with parchment paper and spray with non-stick cooking spray. 

2. To make the crust, stir Oreo cookie crumbs and butter in a small bowl until moistened. Press the crumbs evenly into the bottom of the springform pan. Bake for 8-10 minutes, then transfer to a rack to cool completely.

3. When the crust is completely cooled, sprinkle with chopped peanut butter cups.

4. To make the pie, combine the cream cheese, 3/4 cups powdered sugar and the peanut butter in a large bowl until the mixture is light and fluffy, about 3 minutes.

5. In a seperate bowl, whip the heavy cream until light and thick. Add the 2 tablespoons of powdered sugar and the vanilla extract. Continue to whip until stiff peaks form.

6. Carefully fold the whipped cream into the peanut butter mixture. Pour batter into the springform pan and refrigerate for at least 4 hours.

7. When ready to serve, sprinkle the top with chopped peanut M&M's.

Monday, January 24, 2011

Candy Bar Stuffed Chocolate Chip Cookies

Get a load of these giant cookies! This is yet another fabulous recipe created by Jenny from Picky Palate. You take chocolate chip cookie dough and place a big scoop on the top of your favorite fun size candy bar and place a nice big scoop on the bottom then seal the edges up and bake. The result is a classic buttery, chewy, and perfectly crisp edged chocolate chip cookie with a melty, gooey, and chocolately surprise center!
My candy bars of choice were Snickers, Reese's Peanut Butter Cups, and Milky Ways, but any fun size candy bar would work great, just choose your favorites!
Here's the inside of the Snickers stuffed cookie,
and the inside of the Reese's Peanut Butter Cup cookie,
and finally the Milky Way stuffed cookie, my favorite!

Candy Bar Stuffed Chocolate Chip Cookies: (Picky Palate)
Makes abour 24 large cookies

-2 sticks butter, softened
-1 cup granulated sugar
-3/4 cup brown sugar
-2 large eggs
-1 tablespoon pure vanilla extract
-3 1/2 cups all-purpose flour
-1 teaspoon baking soda
-1/2 teaspoon salt
-10 oz. bag chocolate chips
-variety of fun sized candy bars, about 24

1. Preheat oven to 350 degrees F. In a stand or electric mixer, cream together the butter and sugars until well combined. Add eggs and vanilla until well combined.

2. Place flour, baking soda, and salt in a large bowl; mix and then slowly add to the wet ingredients. Add chocolate chips to combine. Using a cookie scoop, take one scoop of cookie dough and place on top of candy bar. Take another scoop of dough and place on bottom of candy bar. Seal edges together by pressing and cupping in hand until candy is enclosed with dough. Place on parchment or silpat lined baking sheet and bake 9-13, or until cookies are baked to your liking. Let cool for 5 minutes and then transfer to a wire rack to cool completely.

Thursday, January 6, 2011

Jumbo Peanut Butter Cup Cookies

I found these cute mini chocolate covered peanut butter cups at Trader Joe's, which is such a cool store! I wish we had one closer to us, but the closest one is an hour and a half away : ( boo! But, if you are ever  near a Trader Joe's make sure and stop in and check it out, I always find some kind of treasure there! When I saw these mini chocolate covered peanut butter cups there I knew exactly what I wanted to make, and that was an extra large and chewy peanut butter cookie loaded with mini peanut butter cups and chocolate chips....so here it is! By the way, if you don't live near a Trader Joe's, I just saw that HERSHEY's just came out with these extra mini peanut butter cups too, no unwrapping! Enjoy!
                                  Jumbo Peanut Butter Cup Cookies: (adapted from allrecipes)

Ingredients:
-1/2 cup butter, softened
-1/2 cup shortening
-3/4 cup creamy peanut butter
-3/4 cup granulated sugar
-3/4 cup packed brown sugar
-2 eggs
-1 teaspoon vanilla extract
-2 1/3 cups all-purpose flour
-1 teaspoon baking soda
-1 1/2 cups milk chocolate chips
-1 1/2 cups mini chocolate cover peanut butter cups, or regular size peanut butter cups chopped

Directions:
1. Preheat oven to 350 degrees F.

2. In a large bowl, cream together the butter, shortening, peanut butter, and both sugars until smooth. Beat in eggs one at a time, then stir in the vanilla. Combine the flour and baking soda; stir into the peanut butter mixture. Mix in the chocolate chips and mini peanut butter cups. Measure out  a 1/4 cup dough for each cookie and drop dough onto ungreased cookie sheets.

3. Bake for 10-15 minutes. Let cool for one to two minutes on baking sheet before removing onto cooling rack to cool completely.

Thursday, December 30, 2010

A Delicious Cake For My 100th Post!

Here it is, my 100th post, a Chocolate Butterscotch Butterfinger Cake or how about CBB Cake to shorten it up a bit! And I must say that this cake is a pretty darn fabulous one! I think there are several different names for this type of cake, like, "better then sex chocolate cake" or "Harrison Ford cake", and I guess this cake gets its name because of how utterly delicious and divine it is! And I mean really, really yummy and so easy to make. It is usually made with toffee bits and caramel topping but I switched it up a bit, and here's how I did it, and feel free to swap in your favorites! All you do is make your favorite chocolate cake or make a chocolate cake mix according to directions, then you poke holes all over the hot cake, and pour a super sweet glaze, which is a combination of sweetened condensed milk and butterscotch ice cream topping, all over the cake while it is still warm so the glaze can soak into the cake. Finally, it gets topped with creamy Cool Whip and topped with lots and lots of crispy crushed up Butterfingers.
Sweet, dense, super moist, gooey, creamy, cool, chocolately, butterscotchy, and crunchy all in this one bite is what makes this cake so AMAZING!
Chocolate Butterscotch Butterfinger Cake:

-1 recipe for HERSHEY'S "Perfectly Chocolate" Chocolate Cake, found here, or 1 box of your favorite cake mix
-1 (14-ounce) can sweetened condensed milk
-1 (12-ounce) jar butterscotch topping
-1 (12-ounce) container Cool Whip
-2 regular sized Butterfinger candy bars, crushed

1. Prepare the cake according to directions. Immediately after removing the cake from the oven, poke holes with a wooden skewer or fork liberally all over the cake.

2. In a medium sized bowl, combine the sweetened condensed milk and butterscotch topping and then pour it all over the hot cake.

3. Cool cake completely, then spread Cool Whip over the top, then sprinkle with crushed Butterfingers. Store in an airtight container in the refrigerator.

Tuesday, December 21, 2010

Festive Funfetti Cake Batter Bark


I love, love Funfetti Cake and Funfetti Frosting! It is my absolute favorite, and I don't care that they come from a box and a can : ) I also love anything that is cake batter related! Cake batter ice cream is my all time favorite ice cream flavor hands down! So, when I stumbled upon a recipe for cake batter bark on How Sweet It Is, I was very intrigued and tried it immediately with a few adaptations! I used only white chocolate instead of both white and regular chocolate, I used a festive Funfetti Cake mix instead of yellow cake mix and I added cream and Funfetti Frosting to the mix! I must say this bark turned out really, really tasty and super cute and it is absolutely perfect for holiday gift giving. The only thing I will change about it next time is to add more dry cake mix to pump up the cake batter taste, it needed a little bit more of that flavor!


Enjoy!


Festive Funfetti Cake Batter Bark:

-1 (11-ounce) package vanilla/white chocolate chips
-1/4 cup heavy whipping cream
-1 heaping teaspoon Funfetti Cake mix
-1 heaping tablespoon Funfetti frosting
-sprinkles

1. Line a 8x8-inch baking pan with aluminum foil and spray with non-stick cooking spray, set aside.

2. In a heatproof bowl, microwave the white chocolate chips and the cream in 30 second intervals until completely melted and smooth, about a minute and a half. Immediately stir in the cake mix and the frosting. Pour into the prepared pan and decorate with sprinkles.

3. Refrigerate until it hardens and then break it up into pieces. Store it in an airtight container in the refrigerator.


Tuesday, December 14, 2010

Peanut Butter Fudge


It's that time of year for sweet treats, candy making, and baking and fudge is a popular treat that everyone enjoys! This is a super simple peanut butter fudge recipe, no candy thermometor needed, just a microwave and a wooden spoon! It only takes about 5 minutes to make. Enjoy!

Peanut Butter Fudge: (Recipe Courtesy Alton Brown)

Ingredients:
-1 cup butter
-1 cup peanut butter
-1 teaspoon vanilla
-1 pound powdered sugar (about 3 1/2-3 3/4 cups, I used 3 1/2 cups)

Directions:
Microwave butter and peanut butter for 2 minutes on high. Stir and microwave on high for 2 more minutes. Add vanilla and powdered sugar to peanut butter mixture and stir with a wooden spoon until combined. Pour into a greased 8x8-inch pan. Place a piece of wax paper on the surface of the fudge and refrigerate until cool. Cut into 1-inch pieces and store into an airtight container for up to a week.

Wednesday, November 10, 2010

Chocolate Candy Bar Overload Cake


I wanted to use up some leftover halloween candy and I was also having a craving for a moist and delicious chocolate cake, so, this is what I came up with! A Chocolate Candy bar Overload Cake. Of course, I used my favorite chocolate cake recipe from HERSHEY'S, which turns out perfectly everytime, no joke! It is the best, and then I frosted it with HERSHEY'S "Perfectly Chocolate" Chocolate Frosting recipe slightly modified. I used half regular cocoa and half dark cocoa and I really, really loved the flavor combo of the two. Then, I just sprinkled some chopped candy bars in between the 2 cake layers and then decorated the top with some more candy bars!  This sure hit the spot and satisfied my chocolate cake craving and my whole family couldn't rave about it more! My sister said it was the best chocolate cake she has ever had.

HERSHEY'S "Perfectly Chocolate" Chocolate Cake:
For the Cake:
-2 cups sugar
-1 3/4 cups all-purpose flour
-3/4 cup HERSHEY'S cocoa
-1 1/2 teaspoons baking powder
-1 1/2 teaspoons baking soda
-1 teaspoon salt
-2 eggs
-1 cup milk
-1/2 cup vegetable oil
-2 teaspoons vanilla extract
-1 cup boiling water
-"Perfectly Chocoloate" Chocolate Frosting (recipe below)
-2 mini candy bars, coarsely chopped, and about 6 cut into bigger chunks (any kind will do!)

1. Heat oven to 350 degrees F. Grease and flour two 9-inch round cake pans.
2. Stir together sugar, flour, cocoa, baking powder, baking soda and salt in a large bowl. Add eggs, milk, oil and vanilla; beat on medium speed of mixer 2 minutes. Stir in water. (Batter will be thin). Pour batter into prepared pans.
3. Bake 30 to 35 minutes or until wooden pick inserted in center comes out clean. Cool 10 minutes; remove from pans to wire racks. Cool completely.
4. Prepare frosting; spread between layers and sprinkle with about 2 of the coarsely chopped candy bars. Spread the rest of the frosting over the top and side of the cake. Decorate the top of the cake with the bigger chunks of the candy bars as desired.

"Perfectly Chocolate" Chocolate Frosting: (slightly adapted by me)
-1/2 cup (1 stick) butter
-2/3 cup HERSHEY'S cocoa, (I used 1/3 cup of regular cocoa and 1/3 cup of dark cocoa and I really loved the flavor of the combination of the 2, so I highly reccomend doing that : )!)
-4 cups powdered sugar
-1/2 cup-2/3 cup milk
-1 teaspoon vanilla extract

1. Melt butter. Stir in cocoa. Alternately add powdered sugar and milk, beating to spreading consistency, (I beat it for a few minutes on medium-high speed, which gave it a great texture and made it light and fluffy).
2. Stir in vanilla.


Friday, October 29, 2010

Monster Munch


WARNING: This Halloween treat is highly addictive! This yummy monster munch is the perfect sweet and salty combination. It is filled with sweet, melt-in-your-mouth home made caramel corn, crunchy and chocolately peanut m&m's, cheesy and salty CHEEZ-IT crackers, and my favorite, candy corn! Which I absolutely love because they are just so darn cute and tasty and the perfect Halloween candy! Next time, I want to add pretzals into the mix as well! This is one of those treats that you can make your own and put all of your favorite things in, or a great way to clean out your pantry! I think it would also be perfect to put in cute little Halloween baggies and hand out to all your trick-or-treaters! And remember, I warned you!!!!

Monster Munch:
-1 recipe for caramel corn (recipe below)
-1 (9-ounce) box CHEEZ-IT crackers
-1 (11-ounce) package Autumn Mix Candy Corn
-1 medium bag (12.60-ounce) peanut m&m's

In a large bowl, carefully combine the caramel corn, CHEEZ-IT crackers, candy corn, and peanut m&m's. Store in an airtight container. Enjoy!

Caramel Corn: (adapted from Sugar Cooking)
-3.5 quarts (one large bowl) plain popped popcorn
-1 cup brown sugar
-1/4 cup light corn syrup
-1/2 teaspoon salt
-1/2 cup butter
-1/4 teaspoon baking soda
-1/2 teaspoon vanilla

Directions:
1. Line a large baking sheet with parchment paper or aluminum foil. Preheat oven to 250 degrees F.
2.Make popcorn and place in a larg bowl.
3. Combine the brown sugar, corn syrup, salt, and butter in a saucepan. Bring to a boil over medium heat, stirring enough to blend. Once the mixture begins to boil, boil for 5 minutes while stirring constantly.
4. Remove from heat, and stir in baking soda and vanilla. The mixture will be light and foamy. Immediately pour over the popcorn in the bowl. Stir to coat.
5. Bake for 1 hour, removing the pans, and giving them a good stir every 15 minutes. After it has baked, seperate into pieces if needed. Allow to cool completely and then store in airtight containers or ziploc baggies. 


Thursday, October 28, 2010

Halloween Oreo Truffles


These Oreo Truffles are super simple to make, super tasty, and only call for a few ingredients!

Halloween Oreo Truffles: (Kraft foods)

What You Need:
-1 package (8 ounces) cream cheese, softened
-1 package (1 lb. 2 oz.) OREO cookies, finely crushed, (about 4-1/4 cups), divided
-2 packages (8 squares each) BAKER'S semi-sweet chocolate, melted (I used milk chocolate chips)

Make It:
Mix cream cheese and 3 cups of the cookie crumbs until well combined. Shape into 48 (1-inch) balls. Dip into the melted chocolate (I used a double boiler and 2 spoons to dip them in). Place on a baking sheet covered with aluminum foil or parchment paper. Sprinkle with reserved cookie crumbs or Halloween sprinkles. Refrigerate for at least an hour.

Sunday, May 23, 2010

SMS: Butterscotch Pralines


This is my first Sunday baking with Sweet Melissa Sundays, which is where a group of food bloggers bake our way through The Sweet Melissa Baking Book by Melissa Murphy. Each week a different member chooses a recipe to bake from Melissa's baking book. I am very excited about doing this and can't wait to see how all of Melissa's yummy recipes turn out. Her baking book has tons of great recipes in it! This week, Tessa, from The Cookin' Chemist, chose to make butterscotch pralines, so make sure to check her blog out for the recipe and see how hers turned out. 


Overall, these turned out really, really good and my whole family really enjoyed them. They had a great butterscotch flavor which I love and were really quick to make.  But, I think I should have cooked the sugar a little bit longer because the mixture was a bit thin, and some of my butterscotch pralines were pretty thin, but, they still hardened and tasted great! I will make sure to give these another try sometime and cook the sugar a bit longer!