Showing posts with label Fruit. Show all posts

Thursday, June 23, 2011

Roasted Cherry Brownies


Fresh cherries just scream summer to me and they are one of my favorite fruits to snack on through the warm months. Brownies are also a favorite of mine so when I came across this recipe I knew I had to try them, and it had to be soon since cherries are only in season for a short time! Chocolate and cherries are a perfect combination and these brownies were no exception! These were everything a brownie should be, rich and moist, very chocolately and the roasted sweet cherries just pop making these extra special!

Roasted Cherry Brownies: (slightly adapted from The Pastry Affair)

  • 1 cup fresh cherries, pitted and quarted
  • 2 1/2 cups (1 lb.) semi-sweet chocolate chips 
  •  1/2 cup butter
  • 4 eggs
  • 1 cup, plus 1 tablespoon sugar
  • 1 teaspoon vanilla extract
  • 1/2 cup flour
  • 1 teaspoon baking powder
  • 1/4 teaspoon salt

                                                           Preheat oven to 450 degrees F.

In a small roasting pan, combine the fresh cherries and 1 tablespoon sugar. Roast for 10 minutes or until cherries start releasing their juices. Remove cherries from pan, strain the juices, and place in the refrigerator to cool down.

Lower oven temperature to 350 degrees F. Grease a 9x9-inch pan, set aside.

In a double boiler, melt together the semi-sweet chocolate and butter until smooth. Remove from heat.

In a medium bowl, whisk together the eggs, 1 cup of sugar, and vanilla extract until well blended. Add the melted chocolate and mix until incorporated. Gently fold in the flour, baking powder, and salt. Stir in the cooled, roasted cherries. Pour brownie batter into prepared pan and bake for 15-30 minutes (mine took closer to 30 minutes), or until brownies do not jiggle in the center when the pan is shaken.

*Note: It states that even when baked completely, a toothpick may not come out clean. Don't overbake! They are best when slightly under-baked.* 

Sunday, June 12, 2011

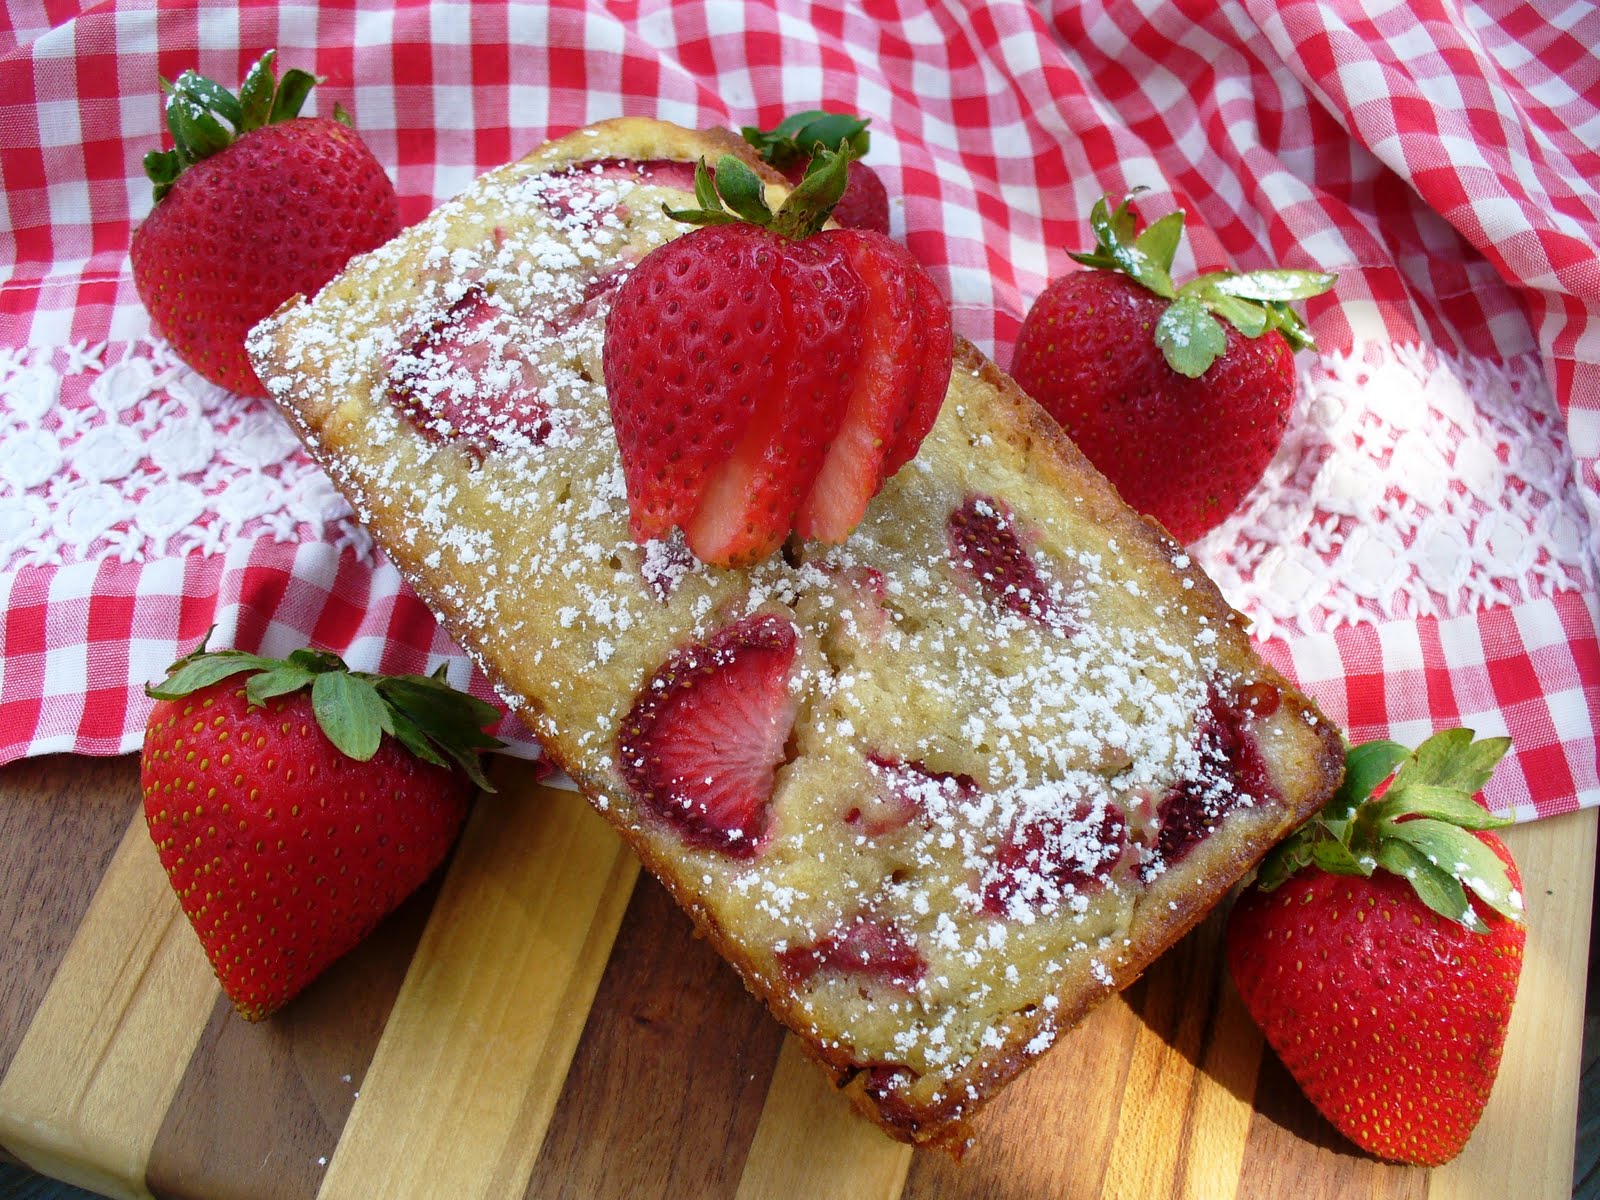
Buttermilk Banana & Strawberry Bread


I am currently obsessed with using buttermilk in baking. If a recipe ever called for buttermilk I would usually just substitute it by adding lemon juice to milk, but never again! This fantastic and extremely moist Cornmeal Buttermilk Cake with Chocolate Buttermilk Frosting (and just to inform you, this is seriously the BEST chocolate frosting I have ever tasted) from Evil Shenanigans definitely changed my mind.

Buttermilk just makes everything so moist and adds a unique and subtle flavor to whatever it is baked into. Since making that cake, I have made my family and I's favorite chocolate cake, (which I use as the base for any recipe that I make which involves chocolate cake) into like the best cake EVER (according to my family and I)! I just substituted buttermilk for regular milk and frosted it with the chocolate buttermilk frosting. I have also made these Blueberry Cornmeal Pancakes, which then leads me to this Buttermilk Banana Strawberry Bread. It is a fabulous quick bread recipe that is very moist, buttery, rich, and so delicious! It is perfect to eat plain, or you can smear it with butter, toast it and spread on jam, or eat it warm with some nutella or drizzled with honey.

Needless to say, I am in love with buttermilk and will be using buttermilk in my baking more and more!


Buttermilk Banana Strawberry Bread: (adapted from Two Peas and Their Pod)

  • 1/2 cup unsalted butter, softened
  • 1 cup granulated sugar
  • 2 large eggs
  • 1 cup mashed bananas (about 3 medium sized bananas)
  • 4 tablespoons buttermilk
  • 1/2 teaspoon vanilla paste or vanilla extract
  • 1-3/4 cups all-purpose flour
  • 1 teaspoon baking powder
  • 1/4 teaspoon salt
  • 1/8 teaspoon baking soda
  • 1 cup diced strawberries, plus 2 whole srawberries thinly sliced for the top
Preheat oven to 350 degrees. Grease and flour 1 large loaf pan or 4 small loaf pans (I used 4 small loaf pans). You can also make banana muffins with this recipe, as well. Set pans aside.

In the bowl of a stand mixer, cream butter and sugar together. Add eggs, mashed bananas, buttermilk, and vanilla until the batter is well mixed.

Add in the flour, baking powder, salt and soda. Mix until well combined. Gently fold in diced strawberries. Divide batter into greased and floured pans and top with thinly sliced strawberries. Bake for 50-55 minutes or until a toothpick inserted in center comes out clean.

Let bread cool on a wire rack for 15 minutes. Loosen the bread with a knife and carefully remove from pan. Cool completely on rack. Slice and serve once cooled.


Wednesday, June 8, 2011

Strawberry & Nutella Shortcake Shooters


These Strawberry & Nutella Shortcake Shooters are the perfect little bite-sized desserts and are a fun and easy take on a classic summer favorite treat! Cake, strawberries, nutella, and whipped topping are all layered into little glasses and ready to enjoy. It is strawberry season and these shooters are a great way to enjoy fresh, perfectly sweet, and juicy summer strawberries!

Strawberry & Nutella Shortcake Shooters: (adapted from Cheeky Kitchen)

  • 1 box Betty Crocker Yellow Cake Mix, prepared and baked according to package directions
  • 1-1/2 cups strawberries, finely diced
  • 1/4 cup sugar
  • 10 teaspoons Nutella
  • 1 (8-oz.) tub cool whip
  • 10 small, whole strawberries
 Cut cake in half, wrap one half very well and store in freezer for later use.

With the second half of cake, crumble it into small pieces. Press a small amount of cake into the bottom of 10 small shot glasses.

In a small bowl, combine the strawberries and sugar. Spoon a bit of strawberries over the cake layer in the shot glasses.

Spoon a teaspoon of Nutella over the strawberries.

Place a second layer of cake over the Nutella layer. Top with a spoonful of cool whip. Garnish with a single strawberry atop each shot glass. Serve immediately, or store chill until ready to serve, for up to an hour.

Tuesday, May 24, 2011

Peanut Butter & Jelly Cookies


Peanut butter and jelly sandwiches are a classic childhood favorite, packed in many lunch boxes over the years. I still love to eat PB&J's now! And what's not to love about a classic PB&J?  They are the perfect combination of creamy and salty peanut butter and sweet jelly sandwiched between two slices of soft bread. This cookie is the perfect treat for any PB&J lover. These jumbo-sized peanut butter cookies are soft and chewy and filled with a center of your favorite sweet jelly. Enjoy!   

Peanut Butter & Jelly Cookies: (peanut butter cookies adapted from Elle's New England Kitchen & idea from Giada)

  • 2 1/2 cups all purpose flour
  • 1 teaspoon baking powder
  • 1/2 teaspoon baking soda
  • 1/2 teaspoon salt
  • 3/4 butter, softened
  • 1/4 cup shortening
  • 1 cup granulated sugar, plus 1/4 cup
  • 1 cup brown sugar
  • 2 large eggs
  • 1 teaspoon vanilla extract
  • peanut butter mixture, see below
  • 1 cup peanut butter chips
  • about 1/2 cup of your favorite jam/jelly

Peanut Butter Mixture

  • 8 oz. peanut butter
  • 2 oz. (1/2 stick butter), softened
  • 2 oz. honey
Heat oven to 350 degrees. Line baking sheets with parchment paper and set aside. Make the peanut butter mixture by combining all of the ingredients. Set aside.

In a medium bowl, mix flour, baking powder, baking soda, and salt, set aside. In a standing mixer or large bowl, cream the 3/4 butter, shortening, and both sugars until light and fluffy. Add the eggs, one at a time, beating well after each addition, then add the vanilla and peanut butter mixture. Add the flour mixture by the cupful and beat at low speed until fully mixed. Stir in the peanut butter chips.

Put the remaining 1/4 of sugar in a small bowl. Form the dough into 1/4 cup-size balls and roll in sugar. Arrange 5 balls of dough, evenly apart, on prepared baking sheets. Using a round 1/4 teaspoon measure, or the thin end of a wooden spoon, make a hole in the center of each ball of dough, about 1/2 to 3/4-inch deep. Spoon about 1 teaspoon jam into each hole. Bake for 11-14 minutes until the dough has spread and the surface of the cookies are crackled. Cool for 5 minutes and transfer to a wire rack to cool completely, about 20 minutes. Serve or store in an airtight container. 


Monday, February 28, 2011

Tropical Island Fruit Pizza


Oh, how I wish that I was vacationing on a tropical island.....
basking in the bright sun with my toes in the sand, a pina colada in hand, listening to the waves crash onto the beach, with a beautiful view of the ocean and palm trees. Oh, how I wish....wouldn't that be wonderful?

Unfortunately, a tropical island get away is not possible for me, so, instead I made this tasty fruit pizza that tastes like a tropical island! Well, okay I don't know what a tropical island tastes like! But if I did, the flavors in this fruit pizza would be it! Give this a try if you are in need of a vacation!
You can imagine that you are somewhere warm and sunny with every bite of this pizza!
Tropical Island Fruit Pizza:

For the pizza dough:
-1 roll (16.5 oz.) refrigerated sugar cookie dough
For the toppings:
-1 package (8 oz.) cream cheese, softened
-1/2 cup powdered sugar
-1 teaspoon coconut extract
-2 kiwis, sliced
-1/2 cup strawberries, sliced
-1/2 cup pineapple, sliced
-1/2 cup toasted coconut

Directions:
1. Preheat oven to 350 degrees F. Line a 13x9-inch baking pan with aluminum foil and spray with non-stick cooking spray. Press cookie dough evenly into the bottom of the prepared baking dish. Bake for 11-15 minutes, or until lightly golden brown and firm to touch. Cool completely.

2. In a medium bowl, blend together the cream cheese, powdered sugar, and coconut extract. Spread the cream cheese mixture evenly onto the baked cookie. Decorate with sliced fruit and sprinkle with toasted coconut. Slice and serve immediately or refrigerate until ready to serve.

*To toast coconut- preheat oven to 350 degrees F. Layer desired amount of coconut evenly onto a baking sheet. Bake for 10-15 minutes, stirring once. Be sure to watch carefully!*

Tuesday, January 11, 2011

Cranberry Almond Cake

I made a delicious Cranberry Almond Cake, but, unfortunately my pictures didn't turn out. Usually when that happens I don't post the recipe,but, this cake was too good to not share with you, so, I am blogging about it anyways! I found the recipe from one of my favorite blogs, Lick The Bowl Good, be sure to check out Monica's blog, she always has wonderful recipes and photos, and then you can see what this cake looks like!

This cake caught my eye because we had a bag of fresh cranberries in our fridge leftover from the holidays that needed to be used up and I had slivered almonds that I bought for a different recipe that I never ended up making. Perfect! I had all the ingredients and the cake seemed very simple to make, and it was! The cake reminded me of a coffeecake, it was incredibly moist and tender and it was filled with fresh tart cranberries which complemented the sweetness of the cake, and then it was topped off with a sweet and crunchy brown sugar and almond topping. Everyone loved it and it is perfect for dessert, breakfast, or a snack!

The only problem that I had with this cake is that it took much longer to bake than the recipe states, so I followed Monica's advice and upped the temperature to 325 degrees after about 1 hour and 30 minutes and baked it for about 10-15 minutes more and then it was done.

Cranberry Almond Cake:

For the Streusal:

-1 cup slivered almonds
-2 tablespoons unsalted butter, melted
-2 tablespoons light brown sugar, packed

For the Cake:

-2 cups all-purpose flour
-1 teaspoon baking powder
-1/4 teaspoon salt
-3 large eggs
-2 cups granulated sugar
-3/4 cup butter, melted and cooled
-1 teaspoon pure vanilla extract
-1 bag (12 oz.) fresh cranberries

Make the Streusal: Preheat oven to 300 degrees F. Grease a 10-inch round springform pan.

Combine the almonds, butter and brown sugar in a medium bowl. Work the mixture between your fingers to form large crumbs. Refrigerate until ready to use.

Make the Cake: Whisk together the flour, baking powder and salt in a medium bowl, set aside. Combine the eggs and granulated sugar in a large mixing bowl and beat with an electric mixer on medium high speed until the mixture is lightened and increased in volume, about 5 minutes.

With the mixer on low, add the butter in a slow stream. Turn the mixer to medium speed and beat for another 2 minutes. Stir in the vanilla.

Gently but thoroughly fold in the flour mixture, 1/2 cup at a time. Stir in the cranberries.

Scrape the batter into prepared pan, smoothing the top with a spatula. Sprinkle the streusal over the batter. Bake the cake until it is golden and a toothpick inserted in the center comes out clean, 1 hour to 1 hour and 10 minutes (mine took over 1 hour and 30 minutes).

Let the cake cool in pan on a cooling rack for 10 minutes. Release the sides of the pan and use a large spatula to slide the cake from the pan bottom to a wire rack. Cool completely, cut into wedges and serve.

Store uneaten cake in a cake keeper or wrap in plastic wrap and store at room temperature for up to 5 days.


Monday, November 29, 2010

Ghirardelli Triple Chocolate Truffle Cake & Outstanding Brownie Pecan Pies


I hope that everyone had a wonderful, relaxing, and restful Thanksgiving and Thanksgiving weekend! I sure did, I was surrounded with family and loved ones and ate lots of delicious food, my favorites to eat on Thanksgiving are sweet potatoes and stuffing covered in my grandma's mushroom gravy! I also went to see Disney's Tangled, the movie, which was just too cute for words, and did a little shopping, but not on black friday. Dessert is my favorite meal of the day, everyday, and Thanksgiving is no different! We had the classics like pumpkin pie and some kind of jello dessert and I wan ted to makea dessert that wasn't so traditional so I made this deliciously rich and decadant truffle cake. It was very chocolately, smooth and creamy and melted in your mouth. It was almost like pudding, yummy! Everyone enjoyed it and liked the little change. I also made two fabulous brownie pecan pies from Bakerella, you can find the recipe on her site, I made the fudgey version, and oh boy was it ever fabulous, I was super excited when I saw this pie posted on her blog. I didn't have time to snatch any pictures, but, they were so good! All you do is take a couple frozen deep dish pie shells and whip up a simple boxed brownie mix and a quick pecan pie filling. Then you divide the prepared brownie mix and pecan pie filling between the two pie shells and bake. They turned out perfectly, a flaky pie crust, topped with fudgey brownie and gooey, sweet, and crunchy pecan pie filling! You get to eat two desserts in one! And, if you really want to make it a little richer, you can top it with whip cream and drizzle it with caramel! 


Ingredients:
-3 cups Ghiradelli semi-seet chocolate chips
-1 cup unsalted butter, at room temperature
-8 large eggs, chilled
-1/4 teaspoon salt
1/2 cup heavy cream
-1 cup Ghirardelli milk chocolate chips
-1 (6-ounce) container fresh raspberries, for garnish

Directions:
1. Preheat oven to 325 degrees F. Arrange a rack in center of oven. Butter or spray the bottom and sides of a 9 by 2-inch round cake pan and line the bottom with parchment paper.

2. In the top of a double boiler or in a heatproof bowl, over barely simmering water, melt the semi-sweet chocolate chips and butter, stirring occasionally until smooth. Cool slightly.

3. Meanwhile, in a large bowl with an electric mixer fitted with the whip attachment, whip the eggs and salt on medium speed until doubled in volume, about 5 minutes. Gently fold the whipped eggs, a third at a time, into melted chocolate. Pour the batter into the prepared cake pan.

4. Prepare a water bath for the cake by placing the cake in a larger pan, and filling the large pan halfway up the sides of the cake pan with hot, but not boiling water.

5. Bake for about 40 minutes, or until the cake pulls away from the edges and the center is set. Remove the pan from the water bath to a cooling rack, and cool the cake completely in the pan. Cover with plastic wrap and refrigerate overnight. Remove the cake from the pan and invert onto a plate to unmold. 

6. To prepare ganache, bring heavy cream to a simmer in a small saucepan over low heat. Pour the heated cream over the milk chocolate chips. Stir gently until smooth and allow to cool slightly. When the ganache is still warm to the touch, pour over the top of cake and spread evenly to cover. Garnish with fresh raspberries if desired. Chill the cake until the ganache sets, about 30 minutes. 

Sunday, November 21, 2010

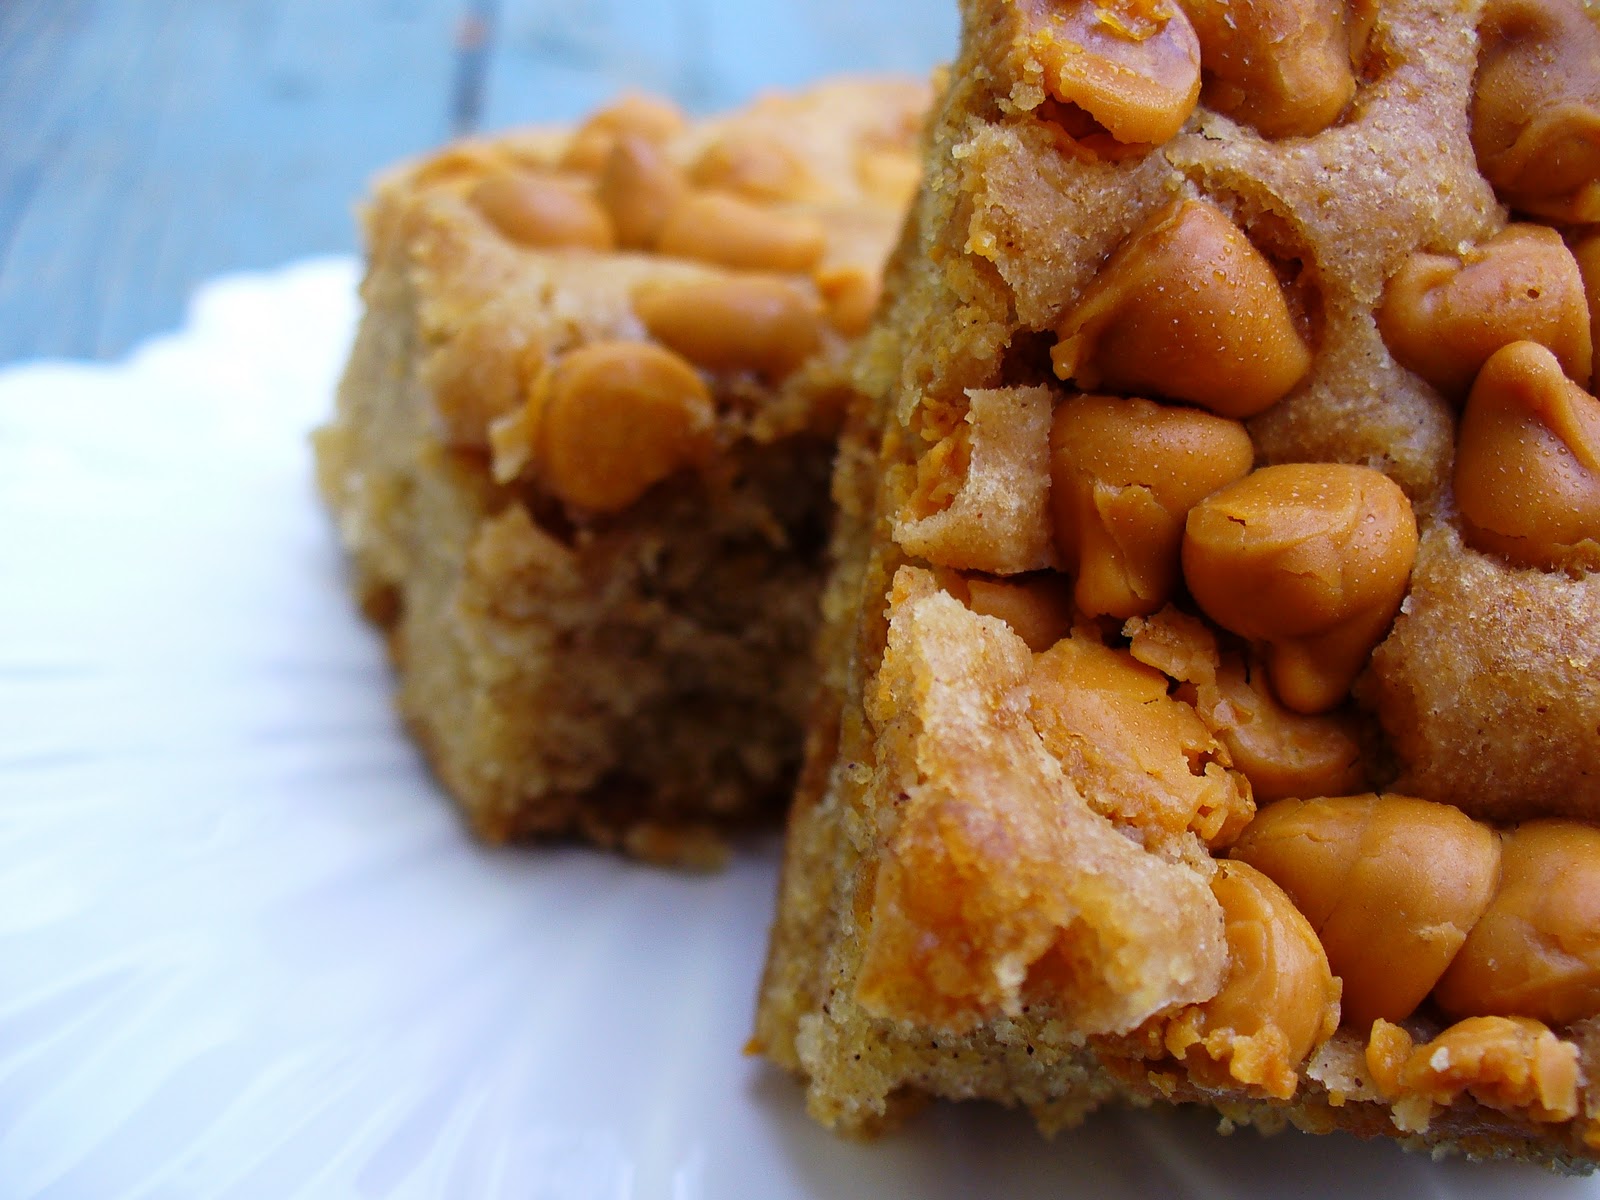
Butterscotch Apple Cake


This is a simple recipe for a yummy apple snack cake filled with diced apples and cinnamon and it gets topped off with butterscotch chips. This is really quick to come together and get in the oven and it comes out moist from the apples and the oil. The aroma throughout the house while it is baking is very enticing and smells like just like autumn. The flavor combination of the apples, cinnamon and butterscotch chips is so tasty!

Butterscotch Apple Cake: (recipe courtesy Sugar Plum)

-2 1/2 cups flour
-2 teaspoons baking powder
-1 teaspoon baking soda
-1 teaspoon ground cinnamon
-3/4 teaspoon salt
-1 cup oil
-1 cup granulated sugar
-2 large eggs, room temperature
-1 teaspoon vanilla extract
-3 cups diced peeled apple
-2 cups butterscotch chips

Heat oven to 325 degrees F. Coat a 13x9-inch glass baking dish with cooking spray.

In a medium mixing bowl, sift together the flour, baking powder, baking soda, cinnamon and salt.  
In a large mixing bowl, using a mixer on medium speed, beat together the oil, sugar, eggs and vanilla for 2-3 minutes or until well combined and doubled in volume. Reduce mixer speed to low and beat in flour mixture until just combined. Stir in apple until combined. Batter will be thick.

Spread batter into prepared baking dish. Evenly sprinkle with butterscotch chips. Bake 45-50 minutes or until well risen, golden brown, and cake pulls away from edges of the dish. Cool on a wire rack.

Monday, November 15, 2010

Pineapple Upside-Down Cake

Beautiful presentation!
Bright red cherries that make the cake pop!
Mmmm pineapple, one of my favorite fruits!
Brown sugar and buttery goodness!

The idea of cooking a cake upside down is an old technique that started many centuries ago when cakes were cooked in cast iron skillets. It was simple to add various types of fruit and sugar in the bottom of a pan and then top it off with a simple cake batter and cook it over a fire. The history of the use of pineapple in an upside-down cake came about sometime after 1911 when James Dole's engineer invented a machine to cut his pineapple into rings, producing canned pineapple. Soon, the convenient pineapple rings were used in this old technique of the skillet cake. 

This pineapple upside-down cake has the perfect combination of flavors and textures. The cake is very moist, has a tender crumb, and has a slight kick from the use buttermilk. It has a rich, sweet, sticky, and caramel flavored topping from the melted butter and brown sugar combo, which is my favorite part, and the pineapple and sweet topping complement each other very well. This is a delicious, melt-in-your-mouth cake that makes such a beautiful presentation. 

Pineapple Upside-Down Cake: (Brown Eyed Baker)
Makes one 9-inch cake

-7 slices canned unsweetened pineapple, (20-ounce can)
-3 tablespoons unsalted butter
-3/4 cup packed light brown sugar
-19 maraschino cherries
-2 large eggs
-2 tablespoons buttermilk
-1/2 teaspoon vanilla
-1 cup all-purpose flour
-3/4 cup granulated sugar
-3/4 teaspoon baking powder
-1/4 teaspoon baking soda
-1/4 teaspoon salt
-6 tablespoons (3/4 stick) unsalted butter, softened
-6 tablespoons buttermilk

1. Preheat oven to 350 degrees F. Have ready a 9x2-inch round cake pan. Drain pineapple and place in one layer on paper towels to absorb excess juice.

2. Place the 3 tablespoons unsalted butter in the cake pan. Place the pan in the oven until the butter is melted. Tilt to coat all sides with butter. The extra butter will settle in the bottom of the pan. Sprinkle the brown sugar evenly over the bottom of the pan.

3. Place one pineapple ring in the center of the pan and arrange six more around it. Pace the cherries in the center of each ring and in the spaces between them.

4. In a small bowl, whisk together the eggs, 2 tablespoons of buttermilk and vanilla with a fork.

5. In a mixer bowl, whisk together the flour, sugar, baking powder, baking soda and salt. Add the 6 tablespoons of unsalted butter and 6 tablespoons of buttermilk. Beat on low speed just until the flour is moistened, then increase the speed to medium, or high if using a handheld mixer, and beat for exactly 1 1/2 minutes. The batter will be stiff. Add on-third of the egg mixture at a time, beating for exactly 20 seconds and scraping the bowl after each addition. Scrape the batter over the fruit in the pan and spread evenly.

6. Bake until a toothpick inserted in the cake comes out clean, 35-40 minutes. Remove the cake from oven and tilt the pan in all directions to detach it from the sides of the pan. Let cool for 2 to 3 minutes before unmolding.

7. Invert a serving platter on top of the pan. Cover your hands with oven mitts and turn the cake onto the platter. Lift off the pan. If any pineapple or cherry pieces askew, use a fork to push them back into place. If any brown sugar is left in the pan, scrape it up and spoon it over the cake. Serve warm or cool.


Wednesday, September 22, 2010

Raspberry Marble Cheesecakes

How adorable are these? I love anything mini and these little cheesecakes are just the perfect mini dessert! A sweet and buttery graham cracker crust gets topped with a tangy, smooth and creamy cheesecake that gets swirled with a fresh and vibrant ruby red raspberry swirl. Aren't they so pretty?
First, you have the graham cracker crust, then the cheesecake, next comes the little dollops of raspberry puree and finally the cheesecake batter and raspberry puree get marbleized together!
Here is a close-up before being baked!
The outcome: simply tasty and beautiful, cute and perfect, little hand-held/bite-sized desserts that are great for any occasion! Everyone gets his or her own, no sharing is necessary (which I love when it comes to dessert)! I also love how the marbleing effect makes each mini cheesecake slightly different from one another. They all have a little swirl of their own!
Raspberry Marble Cheesecakes: (Martha Stewart's Cupcakes)
Makes 32

-1 1/2 cups finely ground graham crackers (about 12 sheets; use a mini chopper or food processor)
-3 tablespoons unsalted butter, melted
-1 1/2 cups plus 5 tablespoons sugar
-1 container (6 ounces) fresh raspberries
-2 pounds cream cheese, room temperature
-pinch of salt
-1 teaspoon pure vanilla extract
-4 large eggs, room temperature

1. Preheat oven to 325 degrees F. Line standard muffin tins with paper liners. Stir together ground graham crackers, butter, and 3 tablespoons sugar. Press 1 tablespoon crust mixture firmly into bottom of each lined cup. Bake until set, about 5 minutes. Transfer tins to a wire rack to cool.

2. Process raspberries in a food processor until smooth, about 30 seconds. Pass puree through a sieve into a small bowl, pressing with a flexible spatula to remove as much liquid as possible; discard solids. Whisk in 2 tablespoons sugar.

3. With an electric mixer on medium-high speed, beat cream cheese until fluffy, scraping down sides of bowl as needed. With mixer on low speed, add remaining 1 1/2 cups sugar in a steady stream. Add salt and vanilla; mix until well combined. Add eggs, one at a time, beating until just combined after each.

4. Spoon 3 tablespoons filling over crust in each cup. Dollop 1/2 teaspoon raspberry puree in a few dots over each. With a wooden toothpick, swirl sauce into filling. Place each tin in a roasting pan (bake in batches if necessary); pour enough hot water into pan to come three-quarters of the way up sides of cups.

5. Bake, rotating pans halfway through, until filling is set, about 22 minutes. Carefully remove tins from water bath and transfer to wire racks to cool completely. Refrigerate (in tins) at least 4 hours (or out of tins up to 5 days in airtight containers). Remove from tins just before serving.

Saturday, September 18, 2010

Peanut Butter Caramel Apple Cookie Bars


Fall is one of my favorite seasons and it is probably my most favorite season to bake in! The air is cool and crisp, the leaves change from color to color, you get to cuddle up under a fuzzy blanket and eat warm comforting meals like homemade chicken and dumplings that satisfy anybody's belly. You get to enjoy fresh warm apple cider and eat caramel apples, I can just taste it now! There are also so many great seasonal items to bake with. Apples being one, and oh how I do love tart Granny Smith apples (they are my fave), so crunchy and crisp! So, here is a yummy recipe for my first fall dessert of the season. It starts with a soft and sweet sugar cookie base which gets topped with a smooth cream cheese, peanut butter and cinnamon mixture. Then, you layer on some fresh tart apples and drizzle it with warm caramel and top it off with crunchy cinnamon-y cashews. Enjoy!

I also have been searching around for canned pumpkin for the past couple of weeks and I finally found some yesterday! Yay, I was so excited! There were about 15 cans on the shelf so I picked up a couple because I have been in great anticipation of baking some pumpkin desserts! Pumpkin is another one of my favorite things to bake with in the fall. I love the aroma of anything pumkin baking, the smell is so intoxicating and enticing and the smell of pumpkin and spice just fills the whole house up with pure Autumn-ness! Happy Fall Baking everyone!


Peanut Butter Caramel Apple Cookie Bars:

-1 package (16.5 ounces) refrigerated sugar cookie dough, softened
-1 package (8 ounces) cream cheese, softened
-1/2 cup powdered sugar
-1/4 cup peanut butter
-1/2 teaspoon vanilla
-1/4 teaspoon cinnamon
-1 medium Granny Smith apple
-1/4 cup caramel ice cream topping
-1/2 cup Cinabon Cinnamon Cashews, chopped (or plain would work just as well)

1. Preheat oven to 350 degrees F. Line a 13x9-inch baking pan with aluminum foil and spray foil with non-stick cooking spray. Press sugar cookie dough evenly into the bottom of the prepared baking pan. Bake for about 12-15 minutes, or until light golden brown. Let cool completely.
2. Combine cream cheese, powdered sugar, peanut butter, vanilla and cinnamon in a small bowl; mix well. Spread cream cheese mixture evenly over cookie.
3. Slice apples to desired thickness and arrange evenly over cream cheese mixture.
4. Microwave ice cream topping for 30 seconds or until warm; drizzle evenly over apples. Chop cashews and sprinkle evenly over apples. Cut in to wedges and enjoy!


Friday, September 3, 2010

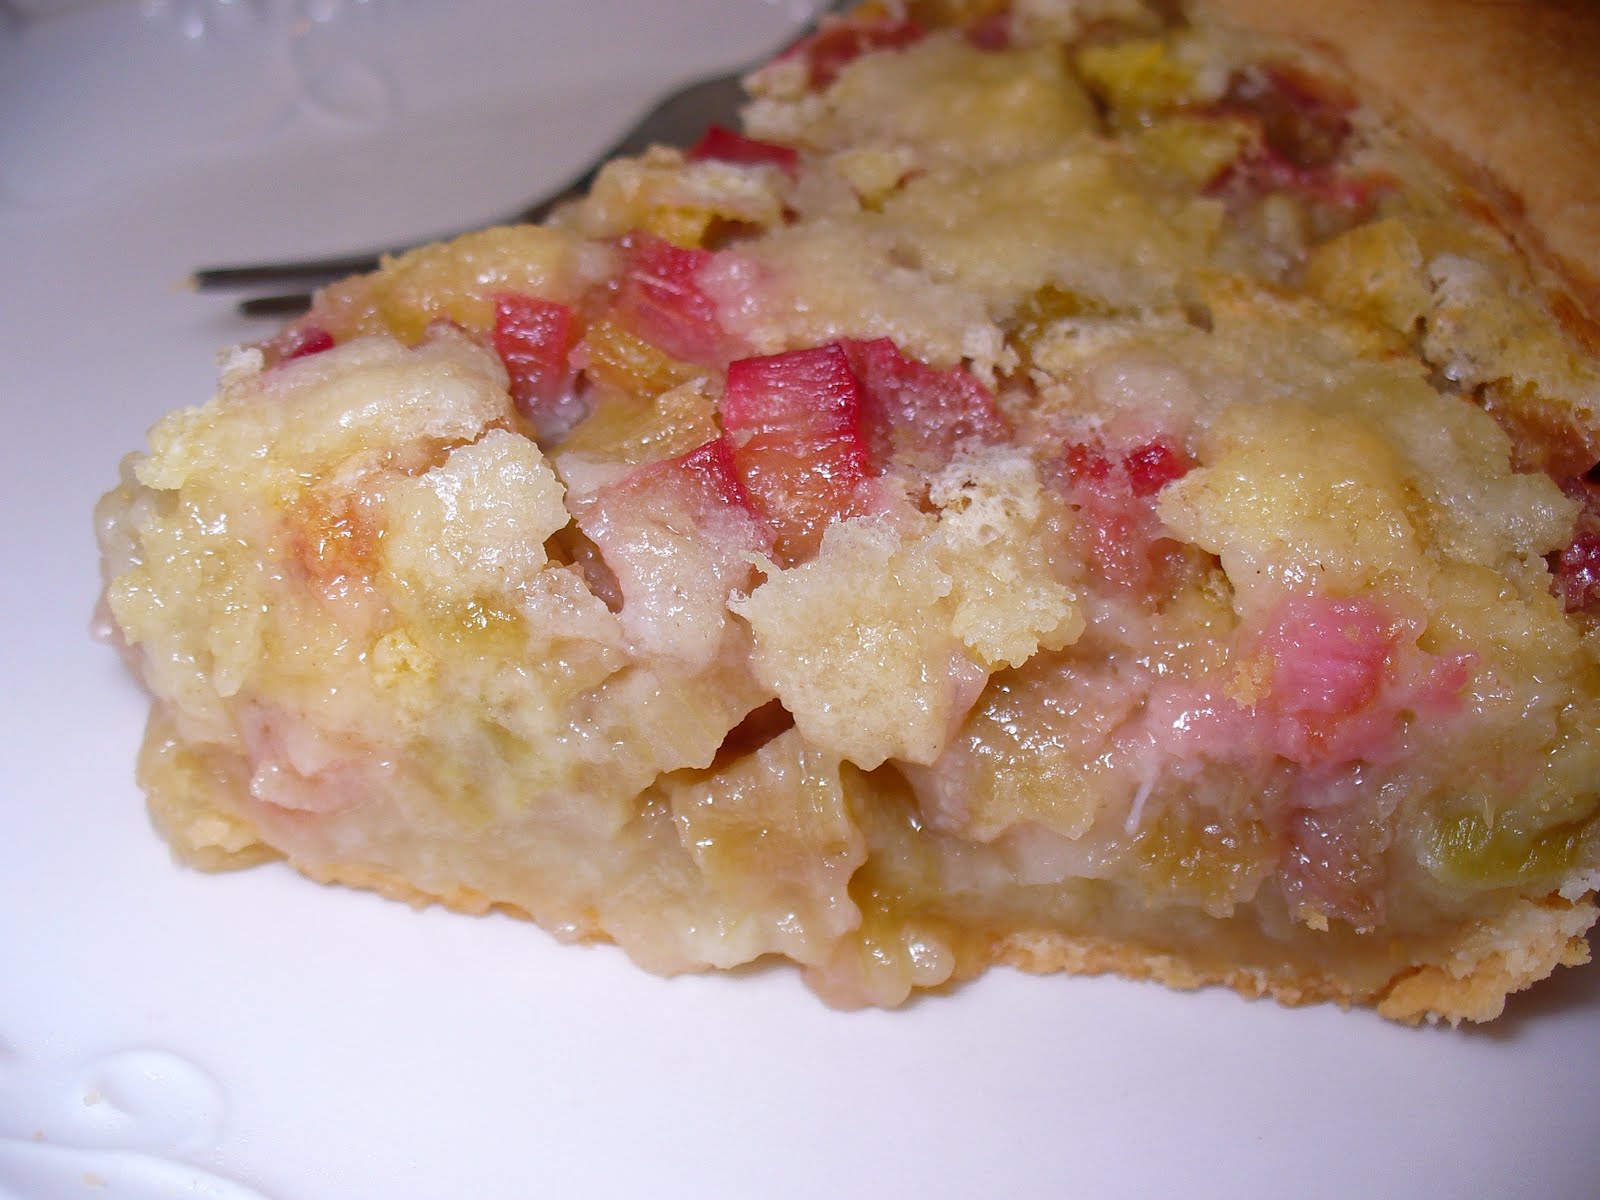
Special Request Rhubarb Custard Pie


My Uncle Dick, who is my Dad's best friend and not related to me by blood, but, has always been and always will be my "Uncle" had a speccial request for me, and that was to make him a rhubarb pie to take to his family reunion. His Mom recently passed away in the spring and rhubarb pie was one of his Mom's favorites, one of her specialties and something that she made often when rhubarb was in season. He had rhubarb growing in his backyard and thought it would be a great idea to take a rhubarb pie to the reunion in honor of his Mom. I, of course, was honored and willing to take on the job of baking him and his family a pie. Uncle Dick picked and chopped up all the rhubarb for me and tried to find his Mom's recipe but he couldn't, he figured she probably didn't have an exact recipe and just made it from memory. I chose to make this Rhubarb Custard Pie that my Grandma and Uncle make. It turned out to be a big hit and his family raved about how good it was and wanted to know what was in it!

Rhubarb Pie: (From Amish and Mennonite Kitchens)

-3 cups diced rhubarb
-1 1/4 cups sugar
-1/4 tsp. salt
-2 Tbsp. water
-3 Tbsp. flour
-1 Tbsp. lemon juice
-2 eggs
-1 9-inch unbaked pie shell

1. Place rhubarb in unbaked pie shell.
2. Combine remaining ingredients and stir to form a smooth paste.
3. Cover with crumbs made by mixing 3 Tbsp. flour, 3 Tbsp. sugar, and 2 Tbsp. butter.
4. Bake at 425 degrees F for 10 minutes; then at 325 degrees F for 30 more minutes.


Tuesday, August 31, 2010

Fruit Salsa


This is a really simple, quick, healthy and tasty recipe that is perfect to take to a potluck or party and would be a great dish for this weekend to take to any of your labor day festivities. It is cool and refreshing and full of tart crunchy granny smith apples, sweet red strawberries, kiwi and orange.

Fruit Salsa:
-2 medium Granny Smith apples
-1 pint strawberries, diced (about 1 1/2 cups)
-2 kiwi, peeled and diced
-1 small orange
-2 tablespoons packed brown sugar
-2 tablespoons strawberry jelly

1. Peel, core and slice apples. Coarsely chop them up. Dice strawberries and kiwi. Place fruit in a medium size bowl.
2. Zest orange, measuring out to 1 teaspoon. Juice orange to measure 2 tablespoons juice. Add orange zest, juice, brown sugar and jelly to fruit mixture; mix gently. Refrigerate until ready to serve.
3. Spoon into serving bowl. Serve with store-bought Cinnamon Chips or Cinnamon Sugar Pita Chips or make your own (recipe following).

Cinnamon Sugar Chips:
-1 large bag of your favorite torilla chips
-cooking spray
-a mix of cinnamon and sugar

1. Preheat oven to 400 degrees F. Spread tortilla chips evenly on a baking sheet. Evenly spray with cooking spray and sprinkle generously with cinnamon sugar mixture. Bake about 5 minutes. Let cool and then serve.


Showing posts with label Fruit. Show all posts

Thursday, June 23, 2011

Roasted Cherry Brownies


Fresh cherries just scream summer to me and they are one of my favorite fruits to snack on through the warm months. Brownies are also a favorite of mine so when I came across this recipe I knew I had to try them, and it had to be soon since cherries are only in season for a short time! Chocolate and cherries are a perfect combination and these brownies were no exception! These were everything a brownie should be, rich and moist, very chocolately and the roasted sweet cherries just pop making these extra special!

Roasted Cherry Brownies: (slightly adapted from The Pastry Affair)

  • 1 cup fresh cherries, pitted and quarted
  • 2 1/2 cups (1 lb.) semi-sweet chocolate chips 
  •  1/2 cup butter
  • 4 eggs
  • 1 cup, plus 1 tablespoon sugar
  • 1 teaspoon vanilla extract
  • 1/2 cup flour
  • 1 teaspoon baking powder
  • 1/4 teaspoon salt

                                                           Preheat oven to 450 degrees F.

In a small roasting pan, combine the fresh cherries and 1 tablespoon sugar. Roast for 10 minutes or until cherries start releasing their juices. Remove cherries from pan, strain the juices, and place in the refrigerator to cool down.

Lower oven temperature to 350 degrees F. Grease a 9x9-inch pan, set aside.

In a double boiler, melt together the semi-sweet chocolate and butter until smooth. Remove from heat.

In a medium bowl, whisk together the eggs, 1 cup of sugar, and vanilla extract until well blended. Add the melted chocolate and mix until incorporated. Gently fold in the flour, baking powder, and salt. Stir in the cooled, roasted cherries. Pour brownie batter into prepared pan and bake for 15-30 minutes (mine took closer to 30 minutes), or until brownies do not jiggle in the center when the pan is shaken.

*Note: It states that even when baked completely, a toothpick may not come out clean. Don't overbake! They are best when slightly under-baked.* 

Sunday, June 12, 2011

Buttermilk Banana & Strawberry Bread


I am currently obsessed with using buttermilk in baking. If a recipe ever called for buttermilk I would usually just substitute it by adding lemon juice to milk, but never again! This fantastic and extremely moist Cornmeal Buttermilk Cake with Chocolate Buttermilk Frosting (and just to inform you, this is seriously the BEST chocolate frosting I have ever tasted) from Evil Shenanigans definitely changed my mind.

Buttermilk just makes everything so moist and adds a unique and subtle flavor to whatever it is baked into. Since making that cake, I have made my family and I's favorite chocolate cake, (which I use as the base for any recipe that I make which involves chocolate cake) into like the best cake EVER (according to my family and I)! I just substituted buttermilk for regular milk and frosted it with the chocolate buttermilk frosting. I have also made these Blueberry Cornmeal Pancakes, which then leads me to this Buttermilk Banana Strawberry Bread. It is a fabulous quick bread recipe that is very moist, buttery, rich, and so delicious! It is perfect to eat plain, or you can smear it with butter, toast it and spread on jam, or eat it warm with some nutella or drizzled with honey.

Needless to say, I am in love with buttermilk and will be using buttermilk in my baking more and more!


Buttermilk Banana Strawberry Bread: (adapted from Two Peas and Their Pod)

  • 1/2 cup unsalted butter, softened
  • 1 cup granulated sugar
  • 2 large eggs
  • 1 cup mashed bananas (about 3 medium sized bananas)
  • 4 tablespoons buttermilk
  • 1/2 teaspoon vanilla paste or vanilla extract
  • 1-3/4 cups all-purpose flour
  • 1 teaspoon baking powder
  • 1/4 teaspoon salt
  • 1/8 teaspoon baking soda
  • 1 cup diced strawberries, plus 2 whole srawberries thinly sliced for the top
Preheat oven to 350 degrees. Grease and flour 1 large loaf pan or 4 small loaf pans (I used 4 small loaf pans). You can also make banana muffins with this recipe, as well. Set pans aside.

In the bowl of a stand mixer, cream butter and sugar together. Add eggs, mashed bananas, buttermilk, and vanilla until the batter is well mixed.

Add in the flour, baking powder, salt and soda. Mix until well combined. Gently fold in diced strawberries. Divide batter into greased and floured pans and top with thinly sliced strawberries. Bake for 50-55 minutes or until a toothpick inserted in center comes out clean.

Let bread cool on a wire rack for 15 minutes. Loosen the bread with a knife and carefully remove from pan. Cool completely on rack. Slice and serve once cooled.


Wednesday, June 8, 2011

Strawberry & Nutella Shortcake Shooters


These Strawberry & Nutella Shortcake Shooters are the perfect little bite-sized desserts and are a fun and easy take on a classic summer favorite treat! Cake, strawberries, nutella, and whipped topping are all layered into little glasses and ready to enjoy. It is strawberry season and these shooters are a great way to enjoy fresh, perfectly sweet, and juicy summer strawberries!

Strawberry & Nutella Shortcake Shooters: (adapted from Cheeky Kitchen)

  • 1 box Betty Crocker Yellow Cake Mix, prepared and baked according to package directions
  • 1-1/2 cups strawberries, finely diced
  • 1/4 cup sugar
  • 10 teaspoons Nutella
  • 1 (8-oz.) tub cool whip
  • 10 small, whole strawberries
 Cut cake in half, wrap one half very well and store in freezer for later use.

With the second half of cake, crumble it into small pieces. Press a small amount of cake into the bottom of 10 small shot glasses.

In a small bowl, combine the strawberries and sugar. Spoon a bit of strawberries over the cake layer in the shot glasses.

Spoon a teaspoon of Nutella over the strawberries.

Place a second layer of cake over the Nutella layer. Top with a spoonful of cool whip. Garnish with a single strawberry atop each shot glass. Serve immediately, or store chill until ready to serve, for up to an hour.

Tuesday, May 24, 2011

Peanut Butter & Jelly Cookies


Peanut butter and jelly sandwiches are a classic childhood favorite, packed in many lunch boxes over the years. I still love to eat PB&J's now! And what's not to love about a classic PB&J?  They are the perfect combination of creamy and salty peanut butter and sweet jelly sandwiched between two slices of soft bread. This cookie is the perfect treat for any PB&J lover. These jumbo-sized peanut butter cookies are soft and chewy and filled with a center of your favorite sweet jelly. Enjoy!   

Peanut Butter & Jelly Cookies: (peanut butter cookies adapted from Elle's New England Kitchen & idea from Giada)

  • 2 1/2 cups all purpose flour
  • 1 teaspoon baking powder
  • 1/2 teaspoon baking soda
  • 1/2 teaspoon salt
  • 3/4 butter, softened
  • 1/4 cup shortening
  • 1 cup granulated sugar, plus 1/4 cup
  • 1 cup brown sugar
  • 2 large eggs
  • 1 teaspoon vanilla extract
  • peanut butter mixture, see below
  • 1 cup peanut butter chips
  • about 1/2 cup of your favorite jam/jelly

Peanut Butter Mixture

  • 8 oz. peanut butter
  • 2 oz. (1/2 stick butter), softened
  • 2 oz. honey
Heat oven to 350 degrees. Line baking sheets with parchment paper and set aside. Make the peanut butter mixture by combining all of the ingredients. Set aside.

In a medium bowl, mix flour, baking powder, baking soda, and salt, set aside. In a standing mixer or large bowl, cream the 3/4 butter, shortening, and both sugars until light and fluffy. Add the eggs, one at a time, beating well after each addition, then add the vanilla and peanut butter mixture. Add the flour mixture by the cupful and beat at low speed until fully mixed. Stir in the peanut butter chips.

Put the remaining 1/4 of sugar in a small bowl. Form the dough into 1/4 cup-size balls and roll in sugar. Arrange 5 balls of dough, evenly apart, on prepared baking sheets. Using a round 1/4 teaspoon measure, or the thin end of a wooden spoon, make a hole in the center of each ball of dough, about 1/2 to 3/4-inch deep. Spoon about 1 teaspoon jam into each hole. Bake for 11-14 minutes until the dough has spread and the surface of the cookies are crackled. Cool for 5 minutes and transfer to a wire rack to cool completely, about 20 minutes. Serve or store in an airtight container. 


Monday, February 28, 2011

Tropical Island Fruit Pizza


Oh, how I wish that I was vacationing on a tropical island.....
basking in the bright sun with my toes in the sand, a pina colada in hand, listening to the waves crash onto the beach, with a beautiful view of the ocean and palm trees. Oh, how I wish....wouldn't that be wonderful?

Unfortunately, a tropical island get away is not possible for me, so, instead I made this tasty fruit pizza that tastes like a tropical island! Well, okay I don't know what a tropical island tastes like! But if I did, the flavors in this fruit pizza would be it! Give this a try if you are in need of a vacation!
You can imagine that you are somewhere warm and sunny with every bite of this pizza!
Tropical Island Fruit Pizza:

For the pizza dough:
-1 roll (16.5 oz.) refrigerated sugar cookie dough
For the toppings:
-1 package (8 oz.) cream cheese, softened
-1/2 cup powdered sugar
-1 teaspoon coconut extract
-2 kiwis, sliced
-1/2 cup strawberries, sliced
-1/2 cup pineapple, sliced
-1/2 cup toasted coconut

Directions:
1. Preheat oven to 350 degrees F. Line a 13x9-inch baking pan with aluminum foil and spray with non-stick cooking spray. Press cookie dough evenly into the bottom of the prepared baking dish. Bake for 11-15 minutes, or until lightly golden brown and firm to touch. Cool completely.

2. In a medium bowl, blend together the cream cheese, powdered sugar, and coconut extract. Spread the cream cheese mixture evenly onto the baked cookie. Decorate with sliced fruit and sprinkle with toasted coconut. Slice and serve immediately or refrigerate until ready to serve.

*To toast coconut- preheat oven to 350 degrees F. Layer desired amount of coconut evenly onto a baking sheet. Bake for 10-15 minutes, stirring once. Be sure to watch carefully!*
Tuesday, January 11, 2011

Cranberry Almond Cake

I made a delicious Cranberry Almond Cake, but, unfortunately my pictures didn't turn out. Usually when that happens I don't post the recipe,but, this cake was too good to not share with you, so, I am blogging about it anyways! I found the recipe from one of my favorite blogs, Lick The Bowl Good, be sure to check out Monica's blog, she always has wonderful recipes and photos, and then you can see what this cake looks like!

This cake caught my eye because we had a bag of fresh cranberries in our fridge leftover from the holidays that needed to be used up and I had slivered almonds that I bought for a different recipe that I never ended up making. Perfect! I had all the ingredients and the cake seemed very simple to make, and it was! The cake reminded me of a coffeecake, it was incredibly moist and tender and it was filled with fresh tart cranberries which complemented the sweetness of the cake, and then it was topped off with a sweet and crunchy brown sugar and almond topping. Everyone loved it and it is perfect for dessert, breakfast, or a snack!

The only problem that I had with this cake is that it took much longer to bake than the recipe states, so I followed Monica's advice and upped the temperature to 325 degrees after about 1 hour and 30 minutes and baked it for about 10-15 minutes more and then it was done.

Cranberry Almond Cake:

For the Streusal:

-1 cup slivered almonds
-2 tablespoons unsalted butter, melted
-2 tablespoons light brown sugar, packed

For the Cake:

-2 cups all-purpose flour
-1 teaspoon baking powder
-1/4 teaspoon salt
-3 large eggs
-2 cups granulated sugar
-3/4 cup butter, melted and cooled
-1 teaspoon pure vanilla extract
-1 bag (12 oz.) fresh cranberries

Make the Streusal: Preheat oven to 300 degrees F. Grease a 10-inch round springform pan.

Combine the almonds, butter and brown sugar in a medium bowl. Work the mixture between your fingers to form large crumbs. Refrigerate until ready to use.

Make the Cake: Whisk together the flour, baking powder and salt in a medium bowl, set aside. Combine the eggs and granulated sugar in a large mixing bowl and beat with an electric mixer on medium high speed until the mixture is lightened and increased in volume, about 5 minutes.

With the mixer on low, add the butter in a slow stream. Turn the mixer to medium speed and beat for another 2 minutes. Stir in the vanilla.

Gently but thoroughly fold in the flour mixture, 1/2 cup at a time. Stir in the cranberries.

Scrape the batter into prepared pan, smoothing the top with a spatula. Sprinkle the streusal over the batter. Bake the cake until it is golden and a toothpick inserted in the center comes out clean, 1 hour to 1 hour and 10 minutes (mine took over 1 hour and 30 minutes).

Let the cake cool in pan on a cooling rack for 10 minutes. Release the sides of the pan and use a large spatula to slide the cake from the pan bottom to a wire rack. Cool completely, cut into wedges and serve.

Store uneaten cake in a cake keeper or wrap in plastic wrap and store at room temperature for up to 5 days.


Monday, November 29, 2010

Ghirardelli Triple Chocolate Truffle Cake & Outstanding Brownie Pecan Pies


I hope that everyone had a wonderful, relaxing, and restful Thanksgiving and Thanksgiving weekend! I sure did, I was surrounded with family and loved ones and ate lots of delicious food, my favorites to eat on Thanksgiving are sweet potatoes and stuffing covered in my grandma's mushroom gravy! I also went to see Disney's Tangled, the movie, which was just too cute for words, and did a little shopping, but not on black friday. Dessert is my favorite meal of the day, everyday, and Thanksgiving is no different! We had the classics like pumpkin pie and some kind of jello dessert and I wan ted to makea dessert that wasn't so traditional so I made this deliciously rich and decadant truffle cake. It was very chocolately, smooth and creamy and melted in your mouth. It was almost like pudding, yummy! Everyone enjoyed it and liked the little change. I also made two fabulous brownie pecan pies from Bakerella, you can find the recipe on her site, I made the fudgey version, and oh boy was it ever fabulous, I was super excited when I saw this pie posted on her blog. I didn't have time to snatch any pictures, but, they were so good! All you do is take a couple frozen deep dish pie shells and whip up a simple boxed brownie mix and a quick pecan pie filling. Then you divide the prepared brownie mix and pecan pie filling between the two pie shells and bake. They turned out perfectly, a flaky pie crust, topped with fudgey brownie and gooey, sweet, and crunchy pecan pie filling! You get to eat two desserts in one! And, if you really want to make it a little richer, you can top it with whip cream and drizzle it with caramel! 


Ingredients:
-3 cups Ghiradelli semi-seet chocolate chips
-1 cup unsalted butter, at room temperature
-8 large eggs, chilled
-1/4 teaspoon salt
1/2 cup heavy cream
-1 cup Ghirardelli milk chocolate chips
-1 (6-ounce) container fresh raspberries, for garnish

Directions:
1. Preheat oven to 325 degrees F. Arrange a rack in center of oven. Butter or spray the bottom and sides of a 9 by 2-inch round cake pan and line the bottom with parchment paper.

2. In the top of a double boiler or in a heatproof bowl, over barely simmering water, melt the semi-sweet chocolate chips and butter, stirring occasionally until smooth. Cool slightly.

3. Meanwhile, in a large bowl with an electric mixer fitted with the whip attachment, whip the eggs and salt on medium speed until doubled in volume, about 5 minutes. Gently fold the whipped eggs, a third at a time, into melted chocolate. Pour the batter into the prepared cake pan.

4. Prepare a water bath for the cake by placing the cake in a larger pan, and filling the large pan halfway up the sides of the cake pan with hot, but not boiling water.

5. Bake for about 40 minutes, or until the cake pulls away from the edges and the center is set. Remove the pan from the water bath to a cooling rack, and cool the cake completely in the pan. Cover with plastic wrap and refrigerate overnight. Remove the cake from the pan and invert onto a plate to unmold. 

6. To prepare ganache, bring heavy cream to a simmer in a small saucepan over low heat. Pour the heated cream over the milk chocolate chips. Stir gently until smooth and allow to cool slightly. When the ganache is still warm to the touch, pour over the top of cake and spread evenly to cover. Garnish with fresh raspberries if desired. Chill the cake until the ganache sets, about 30 minutes. 

Sunday, November 21, 2010

Butterscotch Apple Cake


This is a simple recipe for a yummy apple snack cake filled with diced apples and cinnamon and it gets topped off with butterscotch chips. This is really quick to come together and get in the oven and it comes out moist from the apples and the oil. The aroma throughout the house while it is baking is very enticing and smells like just like autumn. The flavor combination of the apples, cinnamon and butterscotch chips is so tasty!

Butterscotch Apple Cake: (recipe courtesy Sugar Plum)

-2 1/2 cups flour
-2 teaspoons baking powder
-1 teaspoon baking soda
-1 teaspoon ground cinnamon
-3/4 teaspoon salt
-1 cup oil
-1 cup granulated sugar
-2 large eggs, room temperature
-1 teaspoon vanilla extract
-3 cups diced peeled apple
-2 cups butterscotch chips

Heat oven to 325 degrees F. Coat a 13x9-inch glass baking dish with cooking spray.

In a medium mixing bowl, sift together the flour, baking powder, baking soda, cinnamon and salt.  
In a large mixing bowl, using a mixer on medium speed, beat together the oil, sugar, eggs and vanilla for 2-3 minutes or until well combined and doubled in volume. Reduce mixer speed to low and beat in flour mixture until just combined. Stir in apple until combined. Batter will be thick.

Spread batter into prepared baking dish. Evenly sprinkle with butterscotch chips. Bake 45-50 minutes or until well risen, golden brown, and cake pulls away from edges of the dish. Cool on a wire rack.

Monday, November 15, 2010

Pineapple Upside-Down Cake

Beautiful presentation!
Bright red cherries that make the cake pop!
Mmmm pineapple, one of my favorite fruits!
Brown sugar and buttery goodness!

The idea of cooking a cake upside down is an old technique that started many centuries ago when cakes were cooked in cast iron skillets. It was simple to add various types of fruit and sugar in the bottom of a pan and then top it off with a simple cake batter and cook it over a fire. The history of the use of pineapple in an upside-down cake came about sometime after 1911 when James Dole's engineer invented a machine to cut his pineapple into rings, producing canned pineapple. Soon, the convenient pineapple rings were used in this old technique of the skillet cake. 

This pineapple upside-down cake has the perfect combination of flavors and textures. The cake is very moist, has a tender crumb, and has a slight kick from the use buttermilk. It has a rich, sweet, sticky, and caramel flavored topping from the melted butter and brown sugar combo, which is my favorite part, and the pineapple and sweet topping complement each other very well. This is a delicious, melt-in-your-mouth cake that makes such a beautiful presentation. 

Pineapple Upside-Down Cake: (Brown Eyed Baker)
Makes one 9-inch cake

-7 slices canned unsweetened pineapple, (20-ounce can)
-3 tablespoons unsalted butter
-3/4 cup packed light brown sugar
-19 maraschino cherries
-2 large eggs
-2 tablespoons buttermilk
-1/2 teaspoon vanilla
-1 cup all-purpose flour
-3/4 cup granulated sugar
-3/4 teaspoon baking powder
-1/4 teaspoon baking soda
-1/4 teaspoon salt
-6 tablespoons (3/4 stick) unsalted butter, softened
-6 tablespoons buttermilk

1. Preheat oven to 350 degrees F. Have ready a 9x2-inch round cake pan. Drain pineapple and place in one layer on paper towels to absorb excess juice.

2. Place the 3 tablespoons unsalted butter in the cake pan. Place the pan in the oven until the butter is melted. Tilt to coat all sides with butter. The extra butter will settle in the bottom of the pan. Sprinkle the brown sugar evenly over the bottom of the pan.

3. Place one pineapple ring in the center of the pan and arrange six more around it. Pace the cherries in the center of each ring and in the spaces between them.

4. In a small bowl, whisk together the eggs, 2 tablespoons of buttermilk and vanilla with a fork.

5. In a mixer bowl, whisk together the flour, sugar, baking powder, baking soda and salt. Add the 6 tablespoons of unsalted butter and 6 tablespoons of buttermilk. Beat on low speed just until the flour is moistened, then increase the speed to medium, or high if using a handheld mixer, and beat for exactly 1 1/2 minutes. The batter will be stiff. Add on-third of the egg mixture at a time, beating for exactly 20 seconds and scraping the bowl after each addition. Scrape the batter over the fruit in the pan and spread evenly.

6. Bake until a toothpick inserted in the cake comes out clean, 35-40 minutes. Remove the cake from oven and tilt the pan in all directions to detach it from the sides of the pan. Let cool for 2 to 3 minutes before unmolding.

7. Invert a serving platter on top of the pan. Cover your hands with oven mitts and turn the cake onto the platter. Lift off the pan. If any pineapple or cherry pieces askew, use a fork to push them back into place. If any brown sugar is left in the pan, scrape it up and spoon it over the cake. Serve warm or cool.


Wednesday, September 22, 2010

Raspberry Marble Cheesecakes

How adorable are these? I love anything mini and these little cheesecakes are just the perfect mini dessert! A sweet and buttery graham cracker crust gets topped with a tangy, smooth and creamy cheesecake that gets swirled with a fresh and vibrant ruby red raspberry swirl. Aren't they so pretty?
First, you have the graham cracker crust, then the cheesecake, next comes the little dollops of raspberry puree and finally the cheesecake batter and raspberry puree get marbleized together!
Here is a close-up before being baked!
The outcome: simply tasty and beautiful, cute and perfect, little hand-held/bite-sized desserts that are great for any occasion! Everyone gets his or her own, no sharing is necessary (which I love when it comes to dessert)! I also love how the marbleing effect makes each mini cheesecake slightly different from one another. They all have a little swirl of their own!
Raspberry Marble Cheesecakes: (Martha Stewart's Cupcakes)
Makes 32

-1 1/2 cups finely ground graham crackers (about 12 sheets; use a mini chopper or food processor)
-3 tablespoons unsalted butter, melted
-1 1/2 cups plus 5 tablespoons sugar
-1 container (6 ounces) fresh raspberries
-2 pounds cream cheese, room temperature
-pinch of salt
-1 teaspoon pure vanilla extract
-4 large eggs, room temperature

1. Preheat oven to 325 degrees F. Line standard muffin tins with paper liners. Stir together ground graham crackers, butter, and 3 tablespoons sugar. Press 1 tablespoon crust mixture firmly into bottom of each lined cup. Bake until set, about 5 minutes. Transfer tins to a wire rack to cool.

2. Process raspberries in a food processor until smooth, about 30 seconds. Pass puree through a sieve into a small bowl, pressing with a flexible spatula to remove as much liquid as possible; discard solids. Whisk in 2 tablespoons sugar.

3. With an electric mixer on medium-high speed, beat cream cheese until fluffy, scraping down sides of bowl as needed. With mixer on low speed, add remaining 1 1/2 cups sugar in a steady stream. Add salt and vanilla; mix until well combined. Add eggs, one at a time, beating until just combined after each.

4. Spoon 3 tablespoons filling over crust in each cup. Dollop 1/2 teaspoon raspberry puree in a few dots over each. With a wooden toothpick, swirl sauce into filling. Place each tin in a roasting pan (bake in batches if necessary); pour enough hot water into pan to come three-quarters of the way up sides of cups.

5. Bake, rotating pans halfway through, until filling is set, about 22 minutes. Carefully remove tins from water bath and transfer to wire racks to cool completely. Refrigerate (in tins) at least 4 hours (or out of tins up to 5 days in airtight containers). Remove from tins just before serving.

Saturday, September 18, 2010

Peanut Butter Caramel Apple Cookie Bars


Fall is one of my favorite seasons and it is probably my most favorite season to bake in! The air is cool and crisp, the leaves change from color to color, you get to cuddle up under a fuzzy blanket and eat warm comforting meals like homemade chicken and dumplings that satisfy anybody's belly. You get to enjoy fresh warm apple cider and eat caramel apples, I can just taste it now! There are also so many great seasonal items to bake with. Apples being one, and oh how I do love tart Granny Smith apples (they are my fave), so crunchy and crisp! So, here is a yummy recipe for my first fall dessert of the season. It starts with a soft and sweet sugar cookie base which gets topped with a smooth cream cheese, peanut butter and cinnamon mixture. Then, you layer on some fresh tart apples and drizzle it with warm caramel and top it off with crunchy cinnamon-y cashews. Enjoy!

I also have been searching around for canned pumpkin for the past couple of weeks and I finally found some yesterday! Yay, I was so excited! There were about 15 cans on the shelf so I picked up a couple because I have been in great anticipation of baking some pumpkin desserts! Pumpkin is another one of my favorite things to bake with in the fall. I love the aroma of anything pumkin baking, the smell is so intoxicating and enticing and the smell of pumpkin and spice just fills the whole house up with pure Autumn-ness! Happy Fall Baking everyone!


Peanut Butter Caramel Apple Cookie Bars:

-1 package (16.5 ounces) refrigerated sugar cookie dough, softened
-1 package (8 ounces) cream cheese, softened
-1/2 cup powdered sugar
-1/4 cup peanut butter
-1/2 teaspoon vanilla
-1/4 teaspoon cinnamon
-1 medium Granny Smith apple
-1/4 cup caramel ice cream topping
-1/2 cup Cinabon Cinnamon Cashews, chopped (or plain would work just as well)

1. Preheat oven to 350 degrees F. Line a 13x9-inch baking pan with aluminum foil and spray foil with non-stick cooking spray. Press sugar cookie dough evenly into the bottom of the prepared baking pan. Bake for about 12-15 minutes, or until light golden brown. Let cool completely.
2. Combine cream cheese, powdered sugar, peanut butter, vanilla and cinnamon in a small bowl; mix well. Spread cream cheese mixture evenly over cookie.
3. Slice apples to desired thickness and arrange evenly over cream cheese mixture.
4. Microwave ice cream topping for 30 seconds or until warm; drizzle evenly over apples. Chop cashews and sprinkle evenly over apples. Cut in to wedges and enjoy!


Friday, September 3, 2010

Special Request Rhubarb Custard Pie


My Uncle Dick, who is my Dad's best friend and not related to me by blood, but, has always been and always will be my "Uncle" had a speccial request for me, and that was to make him a rhubarb pie to take to his family reunion. His Mom recently passed away in the spring and rhubarb pie was one of his Mom's favorites, one of her specialties and something that she made often when rhubarb was in season. He had rhubarb growing in his backyard and thought it would be a great idea to take a rhubarb pie to the reunion in honor of his Mom. I, of course, was honored and willing to take on the job of baking him and his family a pie. Uncle Dick picked and chopped up all the rhubarb for me and tried to find his Mom's recipe but he couldn't, he figured she probably didn't have an exact recipe and just made it from memory. I chose to make this Rhubarb Custard Pie that my Grandma and Uncle make. It turned out to be a big hit and his family raved about how good it was and wanted to know what was in it!

Rhubarb Pie: (From Amish and Mennonite Kitchens)

-3 cups diced rhubarb
-1 1/4 cups sugar
-1/4 tsp. salt
-2 Tbsp. water
-3 Tbsp. flour
-1 Tbsp. lemon juice
-2 eggs
-1 9-inch unbaked pie shell

1. Place rhubarb in unbaked pie shell.
2. Combine remaining ingredients and stir to form a smooth paste.
3. Cover with crumbs made by mixing 3 Tbsp. flour, 3 Tbsp. sugar, and 2 Tbsp. butter.
4. Bake at 425 degrees F for 10 minutes; then at 325 degrees F for 30 more minutes.


Tuesday, August 31, 2010

Fruit Salsa


This is a really simple, quick, healthy and tasty recipe that is perfect to take to a potluck or party and would be a great dish for this weekend to take to any of your labor day festivities. It is cool and refreshing and full of tart crunchy granny smith apples, sweet red strawberries, kiwi and orange.

Fruit Salsa:
-2 medium Granny Smith apples
-1 pint strawberries, diced (about 1 1/2 cups)
-2 kiwi, peeled and diced
-1 small orange
-2 tablespoons packed brown sugar
-2 tablespoons strawberry jelly

1. Peel, core and slice apples. Coarsely chop them up. Dice strawberries and kiwi. Place fruit in a medium size bowl.
2. Zest orange, measuring out to 1 teaspoon. Juice orange to measure 2 tablespoons juice. Add orange zest, juice, brown sugar and jelly to fruit mixture; mix gently. Refrigerate until ready to serve.
3. Spoon into serving bowl. Serve with store-bought Cinnamon Chips or Cinnamon Sugar Pita Chips or make your own (recipe following).

Cinnamon Sugar Chips:
-1 large bag of your favorite torilla chips
-cooking spray
-a mix of cinnamon and sugar

1. Preheat oven to 400 degrees F. Spread tortilla chips evenly on a baking sheet. Evenly spray with cooking spray and sprinkle generously with cinnamon sugar mixture. Bake about 5 minutes. Let cool and then serve.